How to Install Umami Analytics on Docker
Learn how you can install Umami Analytics on top of docker-compose and get control of your analytics

Umami is a simple, fast, and privacy-focused web analytics tool that serves as an alternative to Google Analytics. It is designed to be easy to use and understand, collecting only the metrics you care about and providing insights while preserving user privacy and data ownership. Similar analytics tools that you can self-hosts are Plausible and Matomo.
Lately, with Google Analytics 4 and GDPR in EU there was a shift in having your analytics self-hosted and not providing access to them to 3PP like Google. Also, Google Analytics code is heavy and it can slow down your website.
Because of the above 2 reasons there were a couple of Analytics tools that have popped and can help you host your Analytics. I am using Plausible to host my analytics and not rely on Google Analytics.
In this tutorial, we are going to see how easy is to host Umami on your VPS server with docker-compose and have an SSL certificate. I will include also an option to backup the database with Docker DB Backup to have the SQL dumps in case something goes wrong and you can’t use the volumes.
We are going to use Dockge to administrate the docker-compose file and as reverse proxy CloudFlare Tunnels. You can also use docker-compose to deploy as it will work the same and whatever reverse proxy you prefer.
If you are interested to see some free cool open source self hosted apps you can check toolhunt.net self hosted section.
Steps to Install Umami Analytics With Docker Compose
1. Prerequisites
Before you begin, make sure you have the following prerequisites in place:
- VPS where you can host Umami Analytics, you can use one from Hetzner
- Docker and Dockge installed on your server, you can check the Dockge - Portainer Alternative for Docker Management for the full tutorial.
- CloudFlare Tunnels are configured for your VPS server, the details are in the article here I deployed Dockge
Having all of this you will be ready to move to next step and add the containers in Dockge.
2. Docker Compose File
Below are the 2 docker-compose files that can be used to have everything set up. First is without any backup and second, it has the backup option with: Docker DB Backup
Simple Docker Compose with No Backup
version: "3"
services:
  umami:
    image: ghcr.io/umami-software/umami:postgresql-latest
    ports:
      - "3000:3000"
    environment:
      DATABASE_URL: postgresql://${POSTGRES_USER}:${POSTGRES_PASSWORD}@umami-db:5432/${POSTGRES_DB}
      DATABASE_TYPE: postgresql
      APP_SECRET: ${APP_SECRET}
    depends_on:
      unami-db:
        condition: service_healthy
    restart: unless-stopped
    healthcheck:
      test: ["CMD-SHELL", "curl http://localhost:3000/api/heartbeat"]
      interval: 5s
      timeout: 5s
      retries: 5
  umami-db:
    image: postgres:15-alpine
    environment:
      POSTGRES_DB: ${POSTGRES_DB}
      POSTGRES_USER: ${POSTGRES_USER}
      POSTGRES_PASSWORD: ${POSTGRES_PASSWORD}
    volumes:
      - ./umami-db-data:/var/lib/postgresql/data
    restart: unless-stopped
    healthcheck:
      test: ["CMD-SHELL", "pg_isready -U $${POSTGRES_USER} -d $${POSTGRES_DB}"]
      interval: 5s
      timeout: 5s
      retries: 5
The above will install umami on port 3000 with the postgres 15 image. The Postgres data is stored in a local volume in the path where you have the docker compose file under umami-db-data. The DB details with user and pass will be set into .env file at next step.
You can use whatever port you want instead of 3000.
Docker Compose with Backup
version: "3"
services:
  umami:
    image: ghcr.io/umami-software/umami:postgresql-latest
    ports:
      - 3000:3000
    environment:
      DATABASE_URL: postgresql://${POSTGRES_USER}:${POSTGRES_PASSWORD}@umami-db:5432/${POSTGRES_DB}
      DATABASE_TYPE: postgresql
      APP_SECRET: ${APP_SECRET}
    depends_on:
      umami-db:
        condition: service_healthy
    restart: unless-stopped
    healthcheck:
      test:
        - CMD-SHELL
        - curl http://localhost:3000/api/heartbeat
      interval: 5s
      timeout: 5s
      retries: 5
  umami-db:
    image: postgres:15-alpine
    environment:
      POSTGRES_DB: ${POSTGRES_DB}
      POSTGRES_USER: ${POSTGRES_USER}
      POSTGRES_PASSWORD: ${POSTGRES_PASSWORD}
    volumes:
      - ./umami-db-data:/var/lib/postgresql/data
    restart: unless-stopped
    healthcheck:
      test:
        - CMD-SHELL
        - pg_isready -U $${POSTGRES_USER} -d $${POSTGRES_DB}
      interval: 5s
      timeout: 5s
      retries: 5
  umami-db-backup:
    container_name: umami-db-backup
    image: tiredofit/db-backup
    volumes:
      - ./backups:/backup
    environment:
      DB_TYPE: postgres
      DB_HOST: umami-db
      DB_NAME: ${POSTGRES_DB}
      DB_USER: ${POSTGRES_USER}
      DB_PASS: ${POSTGRES_PASSWORD}
      DB_BACKUP_INTERVAL: 720
      DB_CLEANUP_TIME: 72000
      #DB_BACKUP_BEGIN: 1
      CHECKSUM: SHA1
      COMPRESSION: GZ
      CONTAINER_ENABLE_MONITORING: false
    depends_on:
      umami-db:
        condition: service_healthy
    restart: unless-stopped
The above docker-compose file has an extra umami-db-backup that will backup the database for 12 to 12 hours and will clean up backups older than 72000 minutes.
They will be stored in a backups folder in the docker compose.
3. Setup .env File
Variables with DB details that will be used by all containers will be stored in .env file, you can create one in the same location of your docker-compose file or add them in Dockge.
POSTGRES_USER='user'
POSTGRES_PASSWORD='pass'
POSTGRES_DB='unami'
APP_SECRET=d1155bc02c5bfd6b2a4c3313113b0b5f0360366aa3b68c56c5299bc4da4efdf8
You replace the values with the things you want for your installation.
4. Deploy Umami
Now you have the docker-compose file and .env details, what remains to be done is to go in Dockde and add a name for your stack and hit deploy. Things should start. If you just want to use docker compose to run this you just do:
docker-compose up -dThis will start all the stacks and you can verify them with:
docker ps5. Configure the CloudFlare Tunnels
You need to let CloudFlare Tunel know which port to use, you just need to go in Access - Tunnels and choose the tunnel you created and add a hostname that will link a domain or subdomain and the service and port.
When choosing a domain or subdomain don’t use something like analytics as you may be blocked by ads blockers.

You can also check Setup CloudPanel as Reverse Proxy with Docker and Dokge to use CloudPanel as a reverse proxy to your Docker containers.
6. Add First Site To Umami
After this is configured you should be able to access Umami with the domain or subdomain you set. First time you will be prompted to add a user and password you can use: user: admin pass: umami . Once logged in click on Settings in the header. Then navigate to Profile and click the Change password button.
Add Website
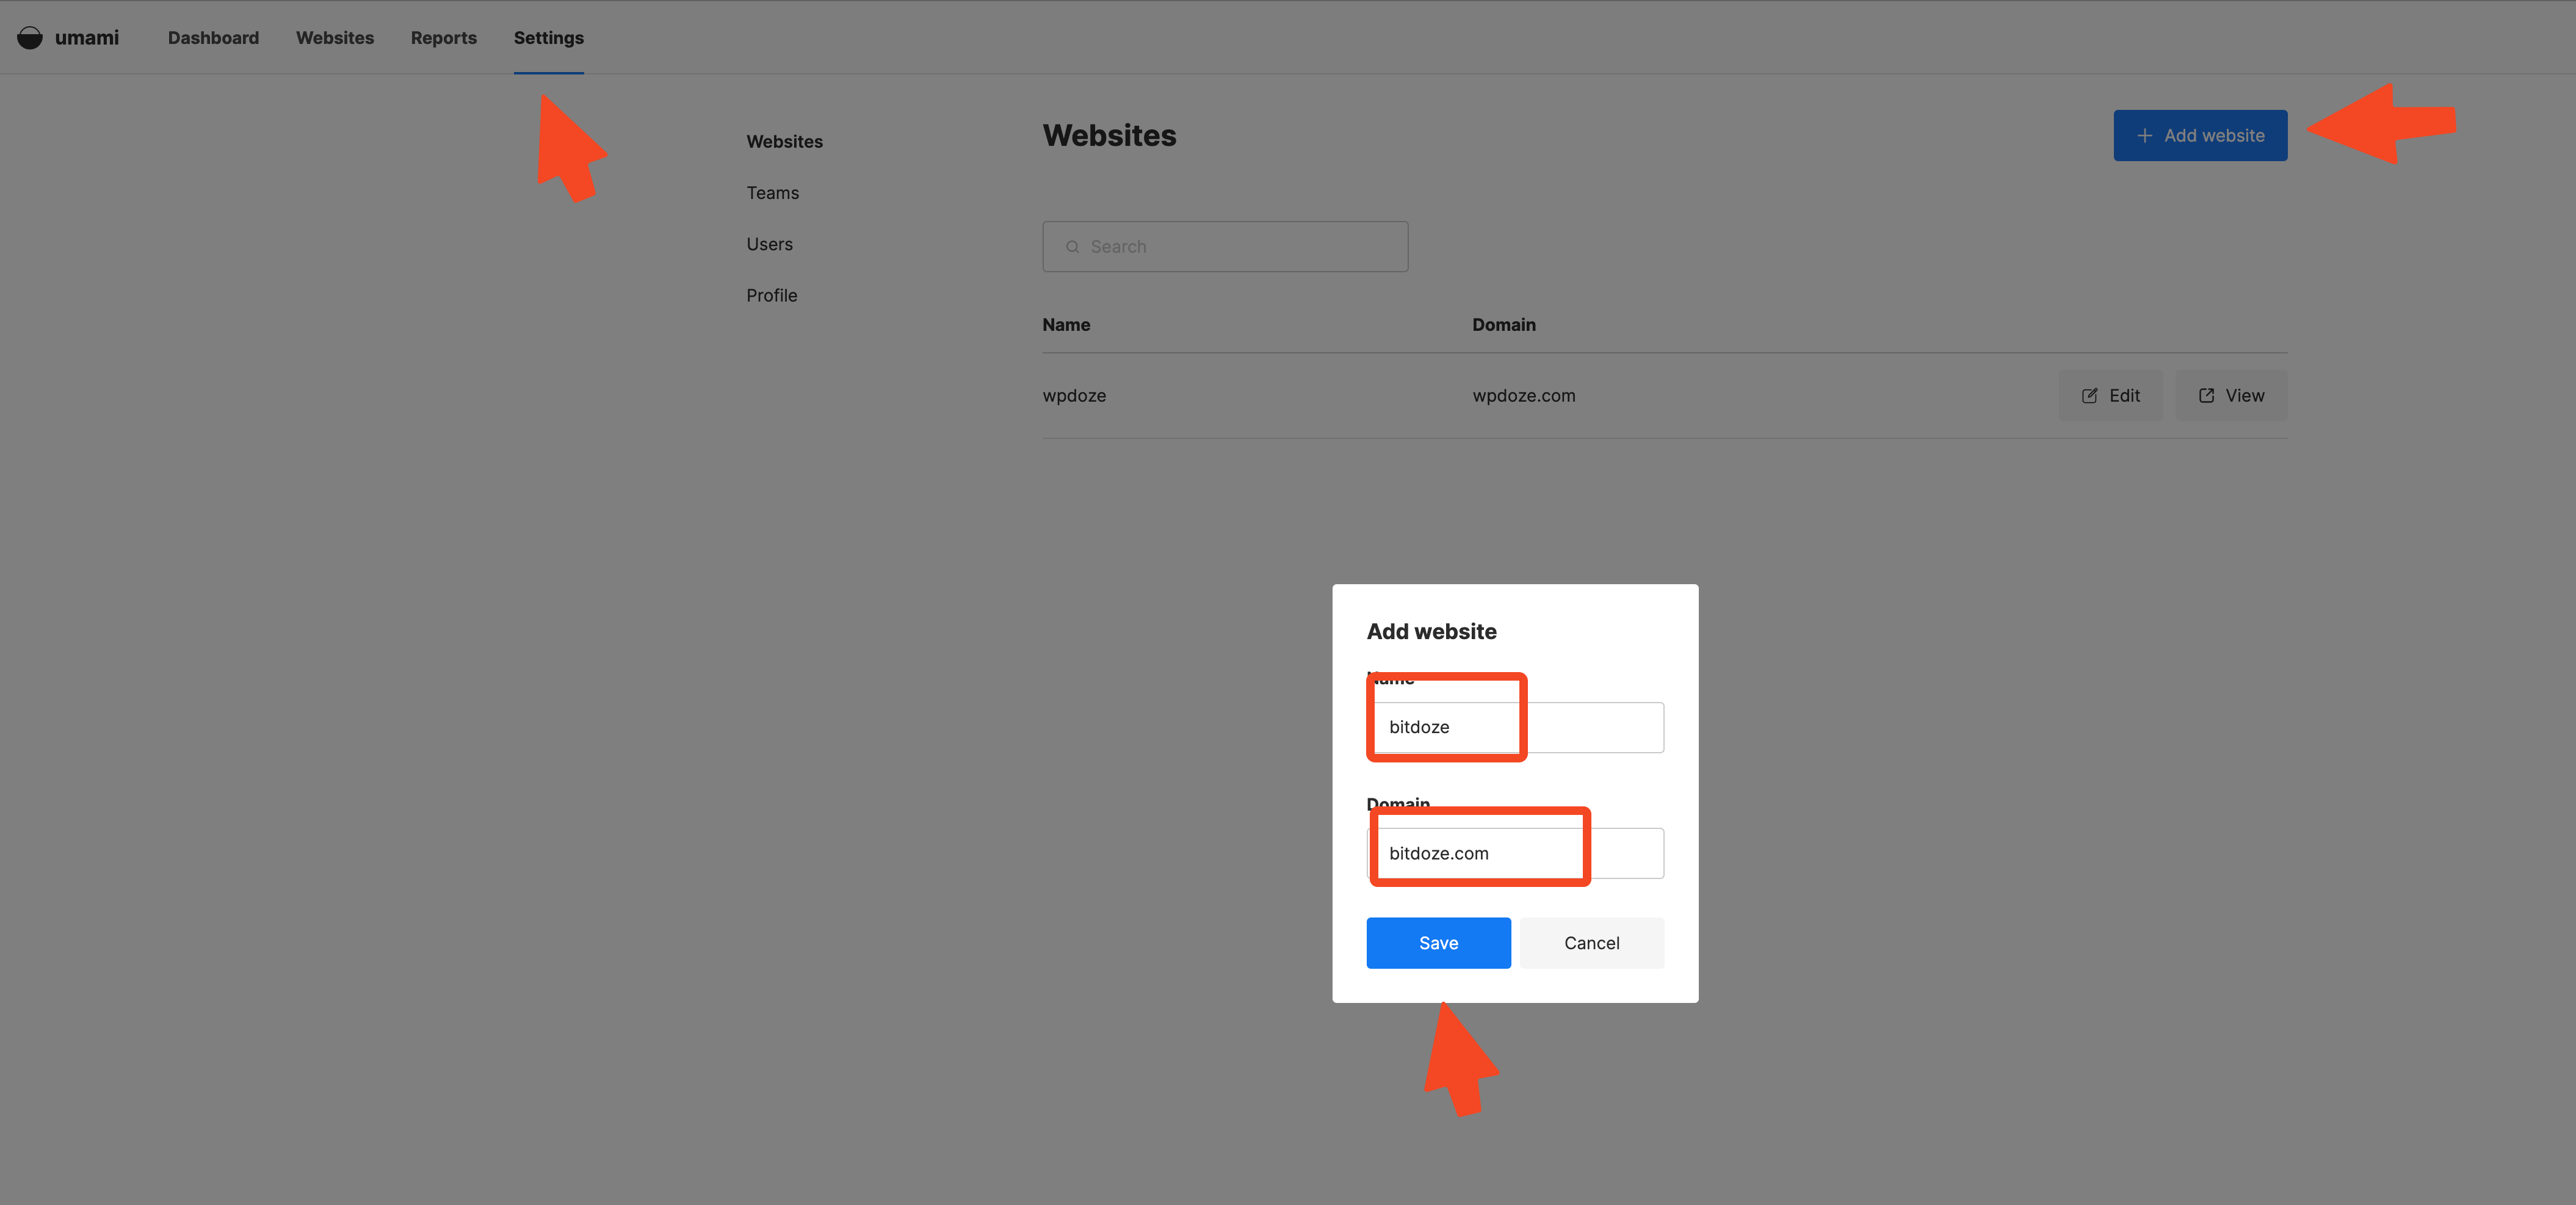
Still in Setting you will have a button to add a website just like in the picture:

After you can hit Edit Website in Websites or Setting and you can access your tracking code that you can use on the site that you want to monitor.

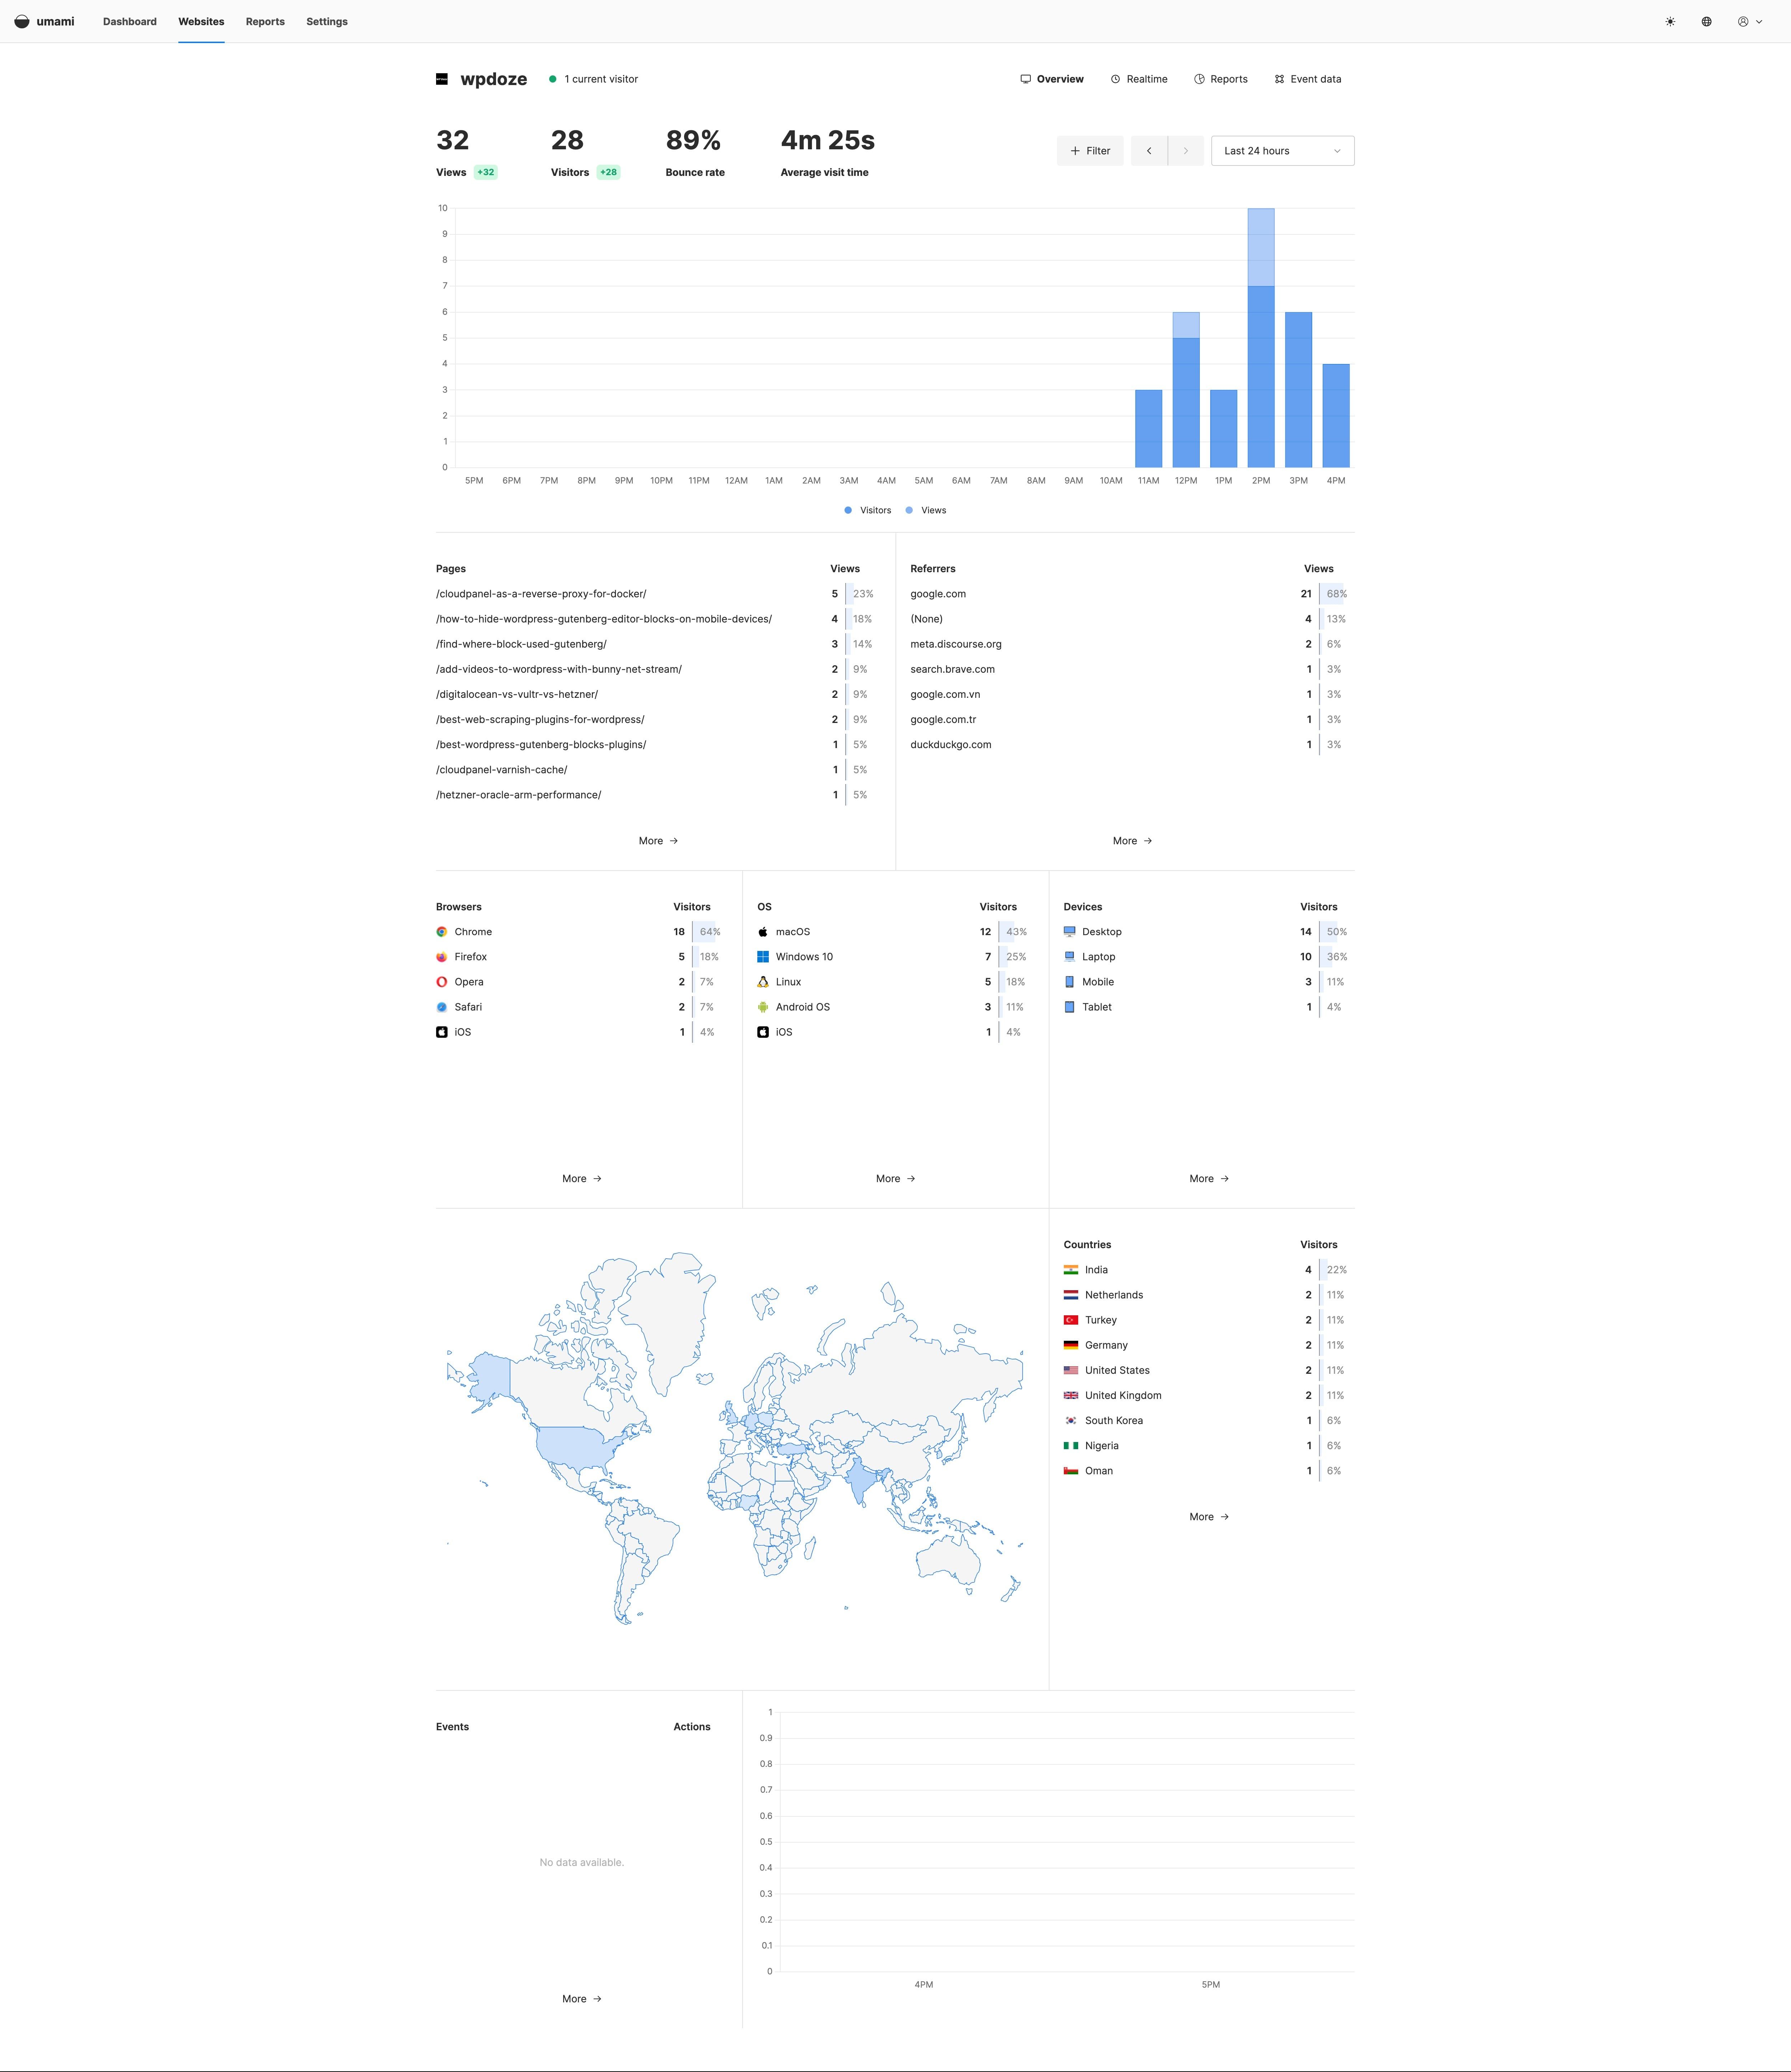
Above is an example of the Umami dashboard running on my website for a couple of hours. As you can see you have the things you need.
Conclusion
That’s all you need to do to have your Google Analytics alternative set up on your server. Umami is great and it has all of the basic things needed to keep track of your website’s stats. Be careful when you update Umami and be sure you have a backup in case something happens to be able to restore the version you had.

