How to Use Traefik as A Reverse Proxy in Docker
Let's see how we can configure Traefik as a reverse proxy for our docker apps with Lets Encrypt and TLS Chalange.

I am using CloudFlare tunnels to drive traffic to my docker applications and I was thinking that the time came to give Traefik a try and configure it and see what it can do. In this article we are going to see exactly how you can configure Traefik from creating the VPS to configure the DNS and installing the Traefik with some applications. Certificates will be created with Lets Encrypt and we are going to use the TLS chalange to get them.
If you need a Let’s Encrypt wildcard certificate with Cloudflare as provider for DNS chalange you can check: Traefik FREE Let’s Encrypt Wildcard Certificate With CloudFlare Provider
Traefik is a modern and powerful reverse proxy and load balancer designed specifically for containerized environments, particularly Docker. As an open-source edge router, Traefik simplifies the process of routing traffic to your microservices and applications by automatically discovering and configuring routes based on your infrastructure. One of Traefik’s key strengths is its seamless integration with Docker. It can automatically detect new containers and dynamically update its configuration to route traffic to them without requiring manual intervention. This makes Traefik an excellent choice for managing and securing Docker containers in both development and production environments.
Some of the main features that make Traefik stand out include:
- Automatic service discovery and configuration
- Support for multiple protocols (HTTP, HTTPS, TCP, UDP)
- Built-in monitoring dashboard
- Easy integration with Let’s Encrypt for automatic SSL/TLS certificate management
- Support for various load balancing algorithms
- Middleware for adding extra functionality like authentication or rate limiting
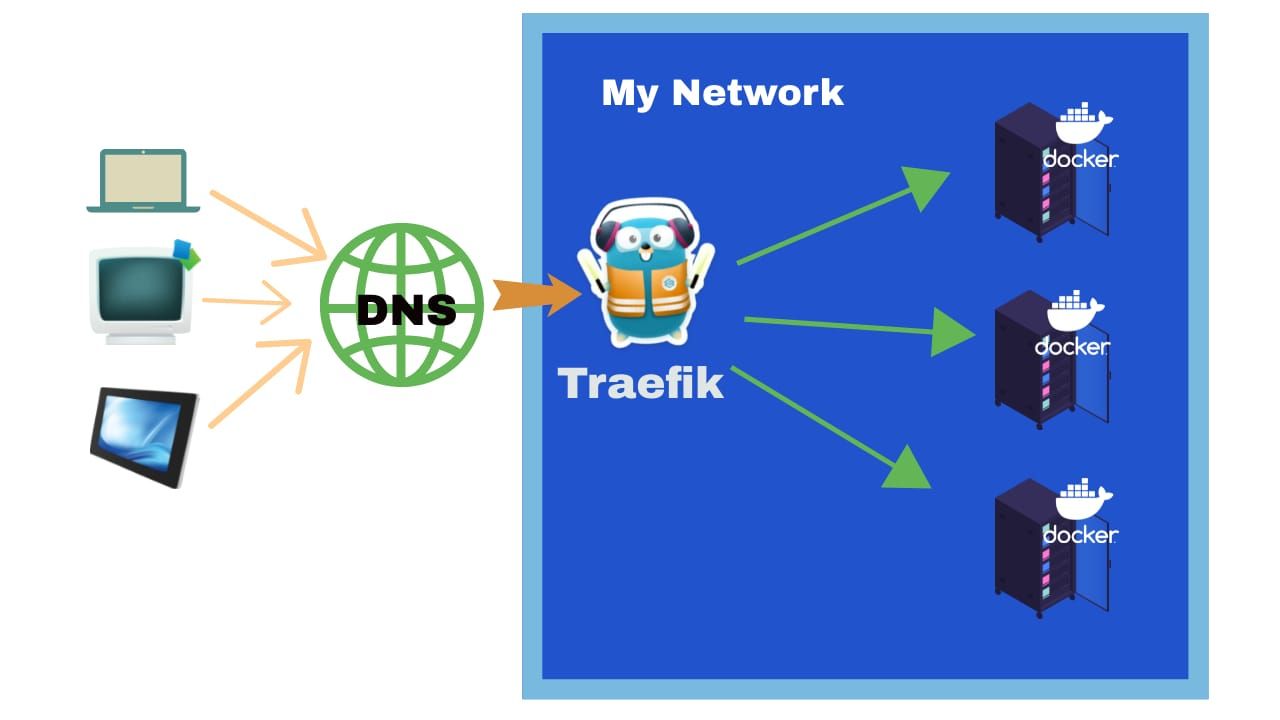
Traefik’s architecture
Traefik’s architecture is built around three main components: EntryPoints, Routers, and Middlewares. Let’s explore each of these in detail:
EntryPoints
EntryPoints are the network entry points into Traefik. They define the ports and protocols on which Traefik listens for incoming traffic.
Key features of EntryPoints:
- Define listening ports for HTTP, HTTPS, or UDP traffic
- Can be configured for TCP and UDP protocols
- Support for multiple EntryPoints (e.g., separate ones for HTTP and HTTPS)
- Can be associated with specific IP addresses
Routers
Routers are responsible for connecting incoming requests to the services that can handle them. They analyze the requests (using rules) and route them accordingly.
Key features of Routers:
- Use rules to determine which requests they should handle
- Can be associated with specific EntryPoints
- Support priority settings to manage overlapping rules
- Can be configured for HTTP, TCP, or UDP traffic
Middlewares
Middlewares are a way to tweak the requests before they are sent to your service (or the responses before they are sent back to the clients). They can be attached to routers and provide a powerful way to apply modifications to requests or responses.
Key features of Middlewares:
- Can modify requests and responses
- Chainable (multiple middlewares can be applied in sequence)
- Provide functionality such as authentication, rate limiting, headers manipulation, etc.
- Can be reused across multiple routers
This configuration creates two middlewares: one for basic authentication and another for compression. These are then applied to the “my-router” router[5].
In summary, EntryPoints define where Traefik listens for traffic, Routers determine how to handle incoming requests based on rules, and Middlewares allow for request/response modifications. Together, these components provide a flexible and powerful system for managing and routing network traffic in containerized environments.
How to Setup Traefik as A Reverse Proxy for Your Docker Apps
In case you are interested to monitor server resources like CPU, memory, disk space you can check: How To Monitor Server and Docker Resources
After we have seen what Traefik is we are going to go thru all the steps that are needed to create and configure a VPS, install Docker and Docker Compose, configure the DNS to point to our server, configure Traefik with the deashboard and deploy some applications.
1. Create a VPS server
To have everything installed we need a VPS server, I have one from Hetzner created and added to a firewall that only allow connections to 443 and 22 port.
2. Add SWAP
Usually VPS server are not having any swap by default, if this is the case, SWAP can be added with below commands:
sudo fallocate -l 4G /swapfile
sudo chmod 600 /swapfile
sudo mkswap /swapfile
sudo swapon /swapfile
echo '/swapfile none swap sw 0 0' | sudo tee -a /etc/fstab
3. Install Docker
The next thing is to have docker and docker compose installed, you can do that on Debian or Ubuntu with below commands:
sudo apt-get update
sudo apt-get install ca-certificates curl gnupg lsb-release
sudo mkdir -p /etc/apt/keyrings
curl -fsSL https://download.docker.com/linux/debian/gpg | sudo gpg --dearmor -o /etc/apt/keyrings/docker.gpg
echo \
  "deb [arch=$(dpkg --print-architecture) signed-by=/etc/apt/keyrings/docker.gpg] https://download.docker.com/linux/ubuntu \
  jammy stable" | sudo tee /etc/apt/sources.list.d/docker.list > /dev/null
sudo apt-get update
sudo apt-get install docker-ce docker-ce-cli containerd.io docker-compose-plugin docker-compose
4. Update the OS and reboot
As best practice it will be good to update the OS to latest version, you can run the below to udpate and reboot:
sudo apt update && sudo apt upgrade
reboot
5. Create the docker compose file for Traefik
Now the interesting part is here, we will go first and create a directory where we will keep all the docker compose files:
cd /opt/
mkdir stacks
cd stacks/
mkdir traefik
cd traefik
Create the docker-compose.yml with the configs.
The below traefik docker-compose file is using the TLS Chalange for obtaining the cert if wildcard is need(in case of a lot off services you need DNS chalange). This is to accomodate all as provider is needed for DNS and API connections.
services:
  traefik:
    image: traefik:v3.1
    container_name: traefik
    restart: unless-stopped
    command:
      #- --log.level=DEBUG
      #- --log.filePath=/letsencrypt/traefik.log
      - --api.dashboard=true
      - --providers.docker=true
      - --providers.docker.exposedbydefault=false
      - --entrypoints.http.address=:80
      - --entrypoints.http.http.redirections.entrypoint.to=https
      - --entrypoints.http.http.redirections.entrypoint.scheme=https
      - --entryPoints.https.address=:443
      - --certificatesresolvers.letsencrypt.acme.tlschallenge=true
      #- --certificatesresolvers.letsencrypt.acme.caserver=https://acme-staging-v02.api.letsencrypt.org/directory
      - [email protected]
      - --certificatesresolvers.letsencrypt.acme.storage=/letsencrypt/acme.json
    security_opt:
      - no-new-privileges:true
    networks:
      - traefik-net
    ports:
      - 80:80
      - 443:443
    environment:
      TRAEFIK_DASHBOARD_CREDENTIALS: ${TRAEFIK_DASHBOARD_CREDENTIALS}
    env_file: .env
    volumes:
      - ./letsencrypt:/letsencrypt
      - /var/run/docker.sock:/var/run/docker.sock:ro
    labels:
      - traefik.enable=true
      - traefik.http.routers.traefik-secure.rule=Host(`traefik.domain.com`)
      - traefik.http.routers.traefik-secure.entrypoints=https
      - traefik.http.routers.traefik-secure.service=api@internal
      - traefik.http.routers.traefik-secure.tls.certresolver=letsencrypt
      - traefik.http.routers.traefik-secure.middlewares=traefik-auth
      - traefik.http.middlewares.traefik-auth.basicauth.users=${TRAEFIK_DASHBOARD_CREDENTIALS}
      - traefik.http.routers.traefik-secure.tls=true
networks:
  traefik-net:
    external: true
Let’s break down each option traefik command:
-
--api.dashboard=true- This enables Traefik’s dashboard.
-
--providers.docker=true- Enables Docker as a provider, allowing Traefik to automatically discover and configure routes for Docker containers.
-
--providers.docker.exposedbydefault=false- Prevents Traefik from automatically exposing all Docker containers. You’ll need to explicitly enable exposure for each container you want to route traffic to.
-
--entryPoints.https.address=:443- Configures an HTTPS entrypoint on port 443, which is the standard port for HTTPS traffic.
-
--certificatesresolvers.letsencrypt.acme.tlschallenge=true- Enables the TLS-ALPN-01 challenge for Let’s Encrypt certificate acquisition. This is used to verify domain ownership.
-
- Specifies the email address to be used for Let’s Encrypt account registration and important notifications.
-
--certificatesresolvers.letsencrypt.acme.storage=/letsencrypt/acme.json- Sets the storage location for the ACME (Let’s Encrypt) information, including certificates, in a JSON file.
-
--entrypoints.http.http.redirections.entrypoint.to=https- This option tells Traefik to redirect all HTTP traffic to the HTTPS entry point.This means any request that comes in over HTTP will automatically be redirected to the equivalent HTTPS URL
-
--entrypoints.http.http.redirections.entrypoint.scheme=https- Ensures that the URL scheme of the redirected request is HTTPS. This is important because, without specifying the scheme, the browser might not change the protocol from http to https during the redirection.
These configurations set up Traefik to work with Docker, use HTTPS, and automatically obtain and manage SSL/TLS certificates from Let’s Encrypt. The setup prioritizes security (except for the insecure API access) and automation in certificate management.
Traefik labels configure Traefik’s routing, security, and authentication for a service. Let’s break them down:
-
traefik.enable=true- Enables Traefik to manage this container.
-
traefik.http.routers.traefik-secure.rule=Host(traefik.domain.com)- Creates a router named “traefik-secure” that handles requests for the domain “traefik.bitdoze.link”].
-
traefik.http.routers.traefik-secure.entrypoints=https- Specifies that this router should listen on the HTTPS entrypoint.
-
traefik.http.routers.traefik-secure.service=api@internal- Routes traffic to Traefik’s internal API service, likely for the dashboard.
-
traefik.http.routers.traefik-secure.tls.certresolver=letsencrypt- Uses the Let’s Encrypt certificate resolver for TLS.
-
traefik.http.routers.traefik-secure.middlewares=traefik-auth- Applies a middleware named “traefik-auth” to this router.
-
traefik.http.middlewares.traefik-auth.basicauth.users=${TRAEFIK_DASHBOARD_CREDENTIALS}- Sets up HTTP Basic Authentication for the “traefik-auth” middleware. More on Traefik Basic Authentication
- The credentials are stored in the
TRAEFIK_DASHBOARD_CREDENTIALSenvironment variable.
-
traefik.http.routers.traefik-secure.tls=true- Enables TLS for this router.
This configuration sets up a secure HTTPS router for the Traefik dashboard, accessible at “traefik.bitdoze.link”. It uses Let’s Encrypt for SSL certificates and requires basic authentication to access the dashboard. The credentials for authentication are stored in an environment variable, which is a good security practice.
6. Create the Docker Network
traefik-net will be used. We need to create it so can be used by docker-compose:
docker network create traefik-net7. Create the .env file with TRAEFIK_DASHBOARD_CREDENTIALS
The credential are hashed and for creating a user and password we need to use: htpasswd
Intall htpasswd:
sudo apt update
sudo apt install apache2-utils
Generate a user and a password for dashboard:
echo $(htpasswd -nb user password) | sed -e s/\\$/\\$\\$/gReplace user and password with your user and password.
edit the .env and add:
TRAEFIK_DASHBOARD_CREDENTIALS=user:password8. Point the domain to Server IP
You can create an A record for your main domain that is pointing to the server IP in any DNS provider and then you can create CNAMES to main domain for subdomains or create an wildcard redirect that will push everything to the main server.
First option is advisable to create subdomains for what you need.
9. Start the Docker Compose file
After DNS is pointing correctly you can go and start the docker compose file with
docker compose up -dUsefull commands:
docker ps
docker logs traefik
docker exec -it traefik /bin/sh
10. Add first app to Traefik
Now as Traefik is up and runnig we can add our first app to Traefik, if you didn’t use a wildcard to redirect be sure that subdomain is pointing to server IP. In the past I have created : Install FlowiseAI with Docker Compose but I was using the CloudFlare Tunnels to route the traffic. Now we are going to use Traefik and the docker-compose file will look as below:
services:
  flowise-db:
    image: postgres:16-alpine
    hostname: flowise-db
    networks:
      - traefik-net
    environment:
      POSTGRES_DB: ${POSTGRES_DB}
      POSTGRES_USER: ${POSTGRES_USER}
      POSTGRES_PASSWORD: ${POSTGRES_PASSWORD}
    volumes:
      - ./flowise-db-data:/var/lib/postgresql/data
    restart: unless-stopped
    healthcheck:
      test: ["CMD-SHELL", "pg_isready -U ${POSTGRES_USER} -d ${POSTGRES_DB}"]
      interval: 5s
      timeout: 5s
      retries: 5

  flowise:
    image: flowiseai/flowise:latest
    container_name: flowiseai
    hostname: flowise
    healthcheck:
      test: wget --no-verbose --tries=1 --spider http://localhost:${PORT}
    volumes:
      - ./flowiseai:/root/.flowise
    environment:
      DEBUG: false
      PORT: ${PORT}
      FLOWISE_USERNAME: ${FLOWISE_USERNAME}
      FLOWISE_PASSWORD: ${FLOWISE_PASSWORD}
      APIKEY_PATH: /root/.flowise
      SECRETKEY_PATH: /root/.flowise
      LOG_LEVEL: info
      LOG_PATH: /root/.flowise/logs
      DATABASE_TYPE: postgres
      DATABASE_PORT: 5432
      DATABASE_HOST: flowise-db
      DATABASE_NAME: ${POSTGRES_DB}
      DATABASE_USER: ${POSTGRES_USER}
      DATABASE_PASSWORD: ${POSTGRES_PASSWORD}
    restart: on-failure:5
    networks:
      - traefik-net
    depends_on:
      flowise-db:
        condition: service_healthy
    entrypoint: /bin/sh -c "sleep 3; flowise start"
    labels:
      - "traefik.enable=true"
      - "traefik.http.routers.flowise.rule=Host(`flowise.domain.com`)"
      - "traefik.http.routers.flowise.entrypoints=https"
      - "traefik.http.routers.flowise.tls.certresolver=letsencrypt"
      - "traefik.http.services.flowise.loadbalancer.server.port=${PORT}"

networks:
  traefik-net:
    external: true
Key Additions:
- Networks:
- Both
flowise-dbandflowiseservices are added to the traefik-net network to enable Traefik to route requests to these services. - You can add an extra network for the DB abd Flowise and not use traefik-net if you want, but the services needs to see each other.
- Labels for flowise:
traefik.enable=true: Enables Traefik for the flowise service.traefik.http.routers.flowise.rule=Host(flowise.domain.com): Defines the routing rule based on the hostname.traefik.http.routers.flowise.entrypoints=https: Specifies the entry point.traefik.http.routers.flowise.tls.certresolver=letsencrypt: Uses Let’s Encrypt for TLS certificates.traefik.http.services.flowise.loadbalancer.server.port=${PORT}: Defines the port on which the flowise service is running inside the container.
- Port:
- the port from the flowise has been removed we are only going to use the docker internal port we don’t need to add anything else.
Ensure you replace flowise.domain.com with the actual domain you intend to use.
11. Create the .env file for flowise :
PORT=3000
POSTGRES_USER='user'
POSTGRES_PASSWORD='pass'
POSTGRES_DB='flowise'
FLOWISE_USERNAME=bitdoze
FLOWISE_PASSWORD=bitdoze
12. Start Flowise and See if is Accessible
source .envdocker compose up -d13. Install Dockge to Manage You Docker Compose files
I have created in the past a detailed tutorial of how you can install Dockge but that was using the Cloudflare tunnels to get access to applications. Let’s see how you can use Dockge with Traefik to manage your applications.
Make a dir for dockge:
mkdir /opt/dockge
cd /opt/dockge
Create the docker-compose.yml file with the necessary things:
services:
  dockge:
    image: louislam/dockge:1
    restart: unless-stopped
    volumes:
      - /var/run/docker.sock:/var/run/docker.sock
      - /opt/stacks:/opt/stacks
    environment:
      - DOCKGE_STACKS_DIR=/opt/stacks
    networks:
      - traefik-net
    labels:
      - "traefik.enable=true"
      - "traefik.http.routers.dockge.rule=Host(`dockge.domain.com`)"
      - "traefik.http.routers.dockge.entrypoints=https"
      - "traefik.http.routers.dockge.tls.certresolver=letsencrypt"
      - "traefik.http.services.dockge.loadbalancer.server.port=5001"
networks:
  traefik-net:
    external: true
Bring Dockge Up:
Before if you are not using a wildcard for subdomain be sure that you are pointing the dockge domain to server IP.
docker compose up -dConclusions
Setting up Traefik is not that hard if you know what you do, after you finish you can easely deploy your applications with the help of Traefik.
