How to Install Outline Wiki on Docker
Learn how you can install Outline Wiki with docker compose to have a self hosted notion alternative.

Outline is a modern team knowledge base and wiki designed to help teams organize their internal documentation, product specs, support answers, meeting notes, onboarding materials, and more. It is positioned as a more focused alternative to Notion, which is an all-in-one workspace that includes a wider range of features such as project management, databases, and content management systems.
Outline Overview
Key Features
- Intuitive Editing Experience: Outline offers a fast editor with markdown support, slash commands, and interactive embeds.
- Simple Integrations: It integrates with tools like Slack, Figma, and Loom, and also provides an open API for additional integrations.
- Language Support: Outline supports right-to-left (RTL) text and is available in 17 languages.
- Open Source: The source code for Outline is publicly available, and it can be self-hosted on your own infrastructure.
- Real-time Collaboration: The platform is designed for real-time collaboration, making document editing and sharing seamless.
- Dark Mode: A dark mode is available for users who prefer it.
- Security & Permissions: Outline allows for detailed management of user permissions.
Outline as a Notion Alternative
- Focus on Knowledge Base: Outline is primarily a knowledge base and documentation platform, whereas Notion is an all-in-one workspace.
- Open Source: For those who prefer open-source solutions, Outline is a strong contender.
- Simplicity: Outline is considered to be simpler and more straightforward compared to Notion, which has a steeper learning curve due to its extensive features.
- Real-time Collaboration: Outline emphasizes real-time collaboration and has been described as closer to a wiki in terms of its functionality.
Considerations
- Limited Use Cases: Outline is more limited in scope compared to Notion, focusing mainly on documentation and knowledge sharing.
- Self-Hosting: Outline can be self-hosted, which is an important consideration for teams with specific privacy or infrastructure requirements.
- No Mobile Apps: Outline does not have mobile apps, which may be a limitation for some users.
In summary, Outline is a streamlined, open-source knowledge base and wiki that can serve as a simpler, more focused alternative to Notion for teams looking to organize their internal documentation and collaborate in real-time. It is particularly appealing to those who prefer open-source software and want to avoid the complexity of an all-in-one tool like Notion.
If you are looking for other not taking apps that are simpler you can check:
Outline can be deployed on a server that has a minimum of 1 CPU and 512MB of RAM. It’s lightweight and can be installed anywhere.
What you Should know Before Installing Outline
Below are some of the things that you should keep in mind if you are trying to install Outline
- Authentication - to authenticate in the app you will need a 3PP, you can use Google Authentication (if you are a Workspace user), Slack or Microsoft, you can also use your own image with oidc-server
- Storage - files can be stored on S3 buckets or locally, you can use Amazon S3 or Minio image to store files.
- Databases - it uses Redis and Postgress SQL for databases.
How To Install Outline with Docker Compose
If you are interested to see some free cool open source self hosted apps you can check toolhunt.net self hosted section.
In this section, we are going to see what exactly we need to do to have Outline working on our docker compose as easily as possible. We are going to store the files locally as Outline is permitting this now.
1. Prerequisites
Before you begin, make sure you have the following prerequisites in place:
- VPS where you can host Slash, you can use one from Hetzner or use a Mini PC as Home Server
- Docker and Dockge installed on your server, you can check the Dockge - Portainer Alternative for Docker Management for the full tutorial. CloudFlare Tunnels are configured for your VPS server, the details are in the article here I deployed Dockge
You can use also Traefik as a reverse proxy for your apps. I have created a full tutorial with Dockge install also to manage your containers on: How to Use Traefik as A Reverse Proxy in Docker
Having all of this you will be ready to move to next step and add the container in dockge.
2. Get Slack credentials
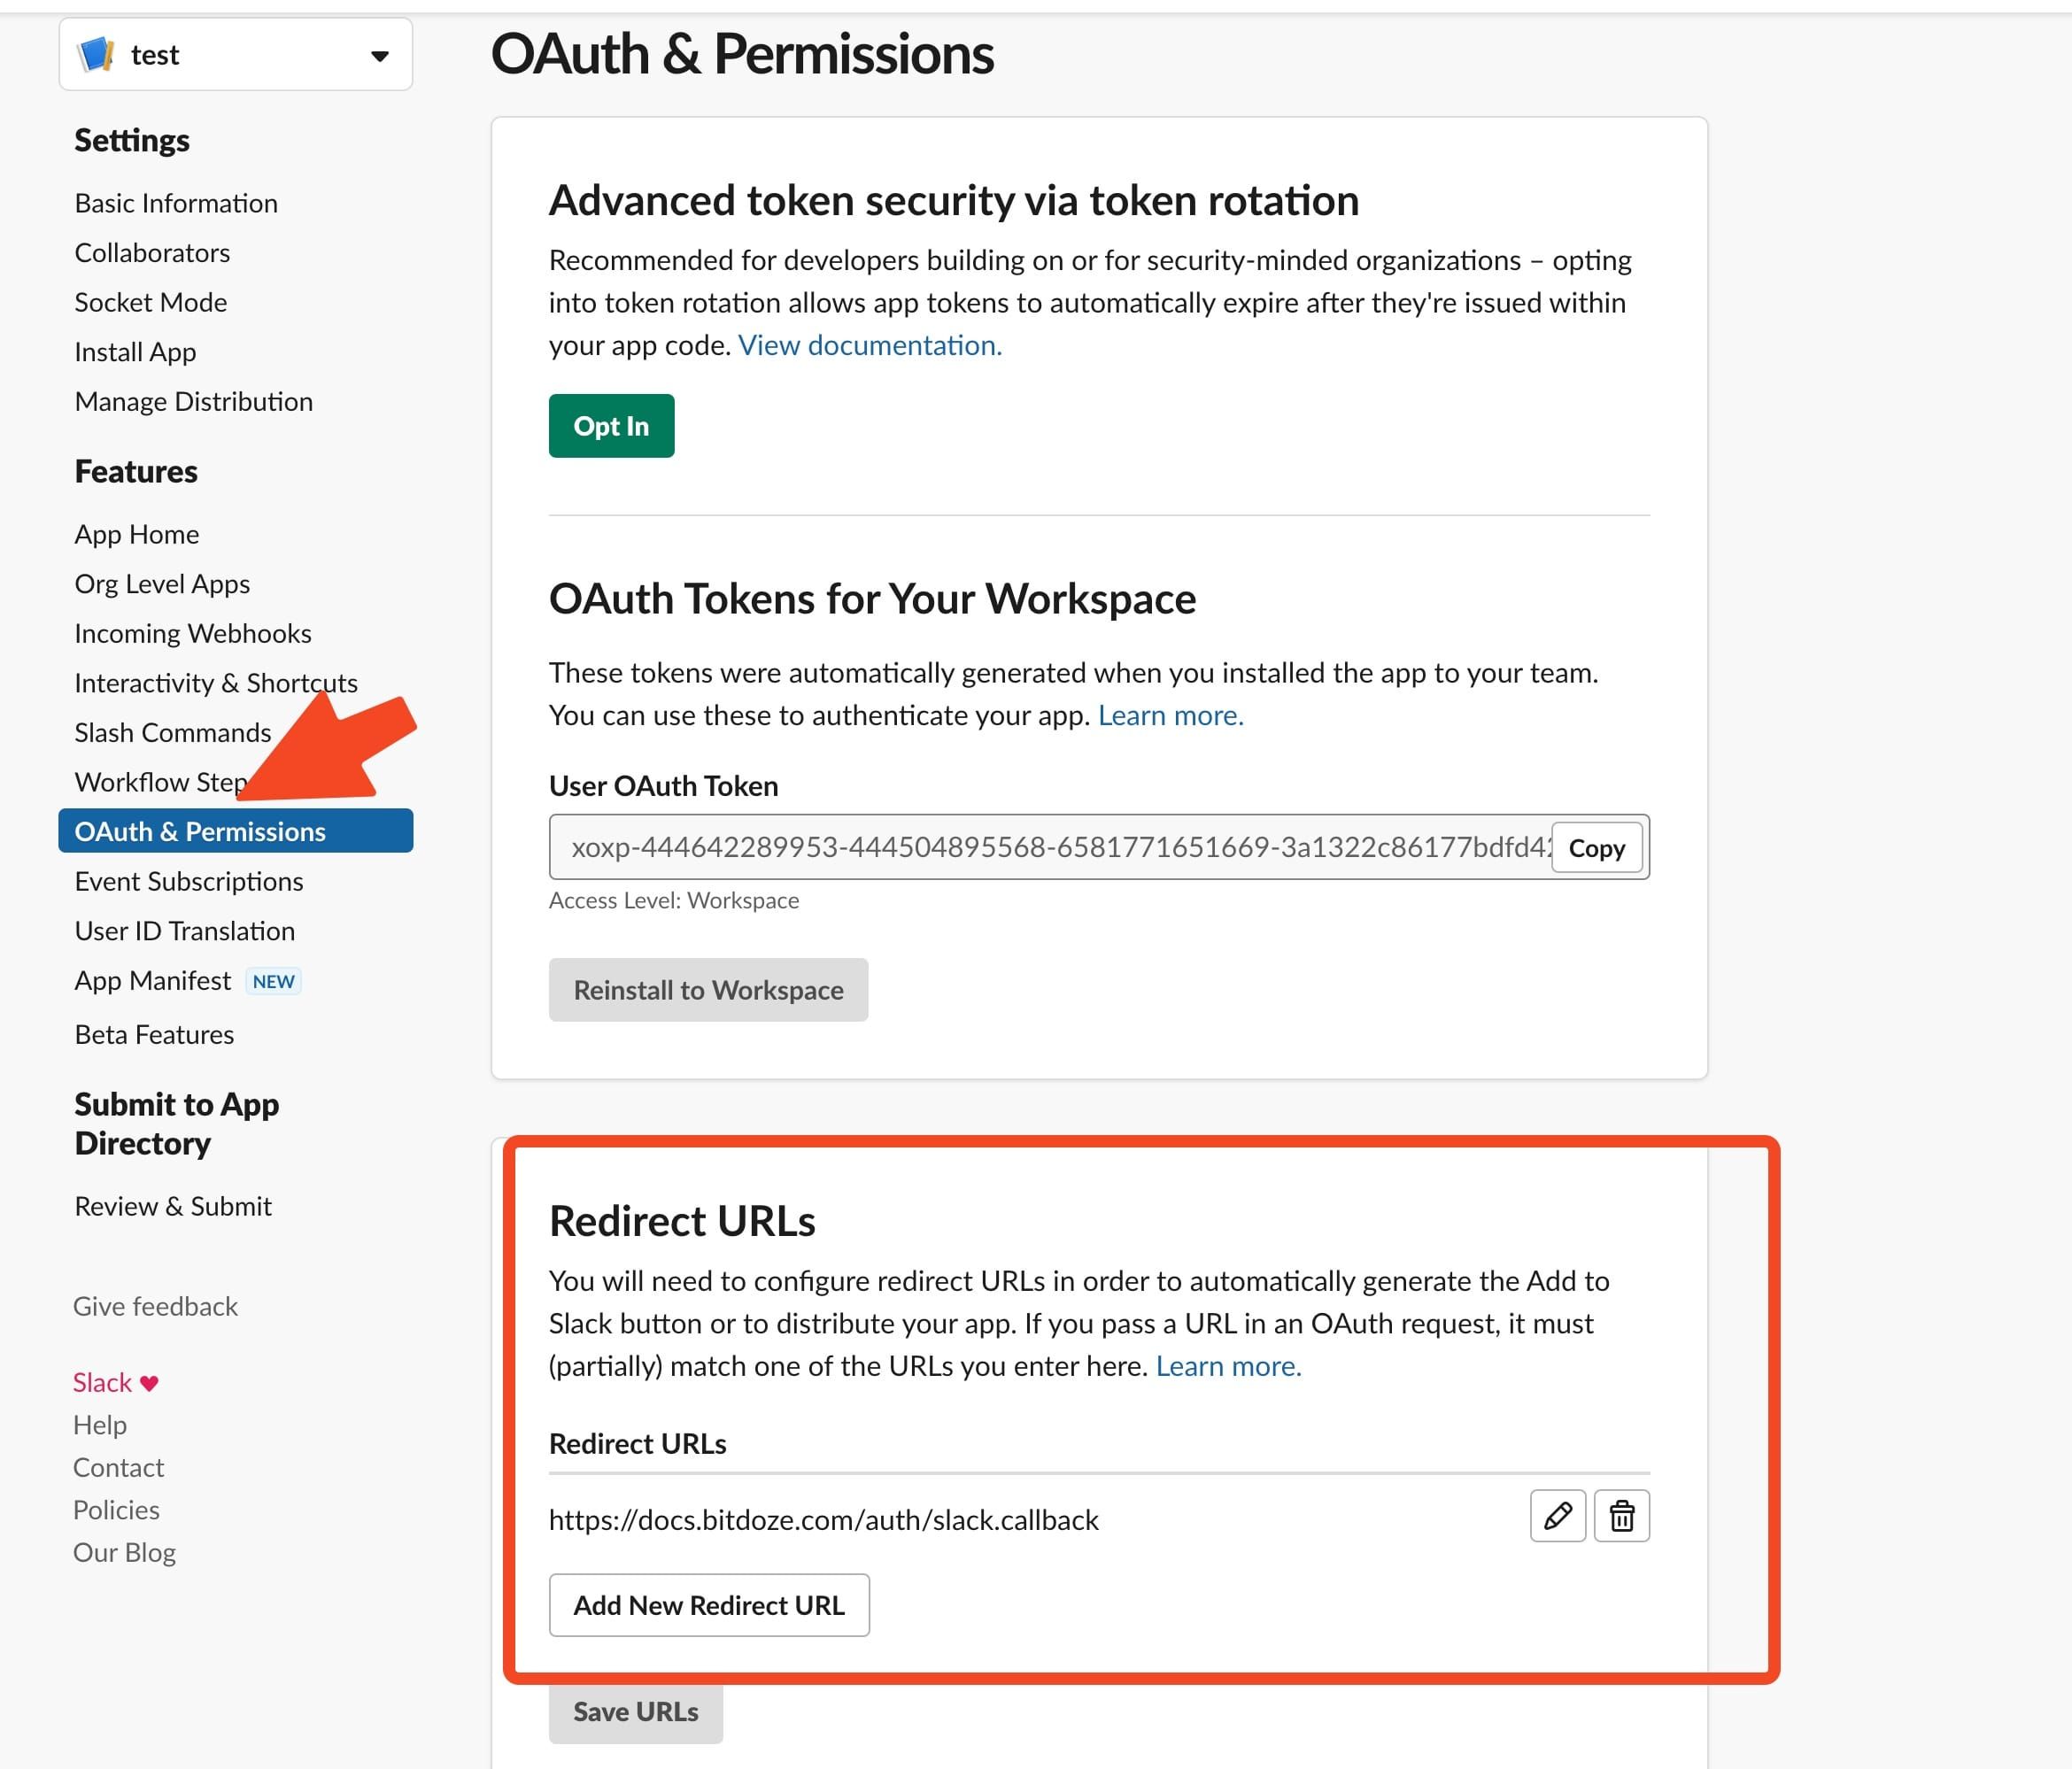
Slack is free to use and we are going to use Slack as an authentication method for our Outline. To do this you need to go in Slack in Slack API Apps and you are going to create an app. In there under OAuth & Permissions you add your redirect URL it needs to be with /auth/slack.callback at the end, in my case:
https://docs.bitdoze.com/auth/slack.callback
After you can go under Basic Information and get your Client ID and Client Secret. You will need them in the next section
3. Docker Compose File
Docker-compose file will make all of this possible and now we have the below file created for outline that can be used:
version: "3.2"
services:
  outline:
    image: docker.getoutline.com/outlinewiki/outline:latest
    container_name: outline-app
    hostname: outline-app
    ports:
      - 3000:3000
    volumes:
      - ./storage-data:/var/lib/outline/data
    depends_on:
      - postgres
      - redis
    environment:
      PGSSLMODE: disable
      SECRET_KEY: ${SECRET_KEY}
      UTILS_SECRET: ${UTILS_SECRET}
      DATABASE_URL: postgres://${POSTGRES_USER}:${POSTGRES_PASSWORD}@outline-postgres:5432/${POSTGRES_DB}
      REDIS_URL: redis://outline-redis:6379
      URL: ${URL}
      PORT: ${PORT}
      FILE_STORAGE: local
      FILE_STORAGE_LOCAL_ROOT_DIR: /var/lib/outline/data
      FILE_STORAGE_UPLOAD_MAX_SIZE: 26214400
      SLACK_CLIENT_ID: ${SLACK_CLIENT_ID}
      SLACK_CLIENT_SECRET: ${SLACK_CLIENT_SECRET}
    restart: unless-stopped
  redis:
    container_name: outline-redis
    hostname: outline-redis
    image: redis
    volumes:
      - ./redis.conf:/redis.conf
    command:
      - redis-server
      - /redis.conf
    healthcheck:
      test:
        - CMD
        - redis-cli
        - ping
      interval: 10s
      timeout: 30s
      retries: 3
    restart: unless-stopped
  postgres:
    image: postgres
    container_name: outline-postgres
    hostname: outline-postgres
    volumes:
      - ./database-data:/var/lib/postgresql/data
    healthcheck:
      test:
        - CMD
        - pg_isready
      interval: 30s
    environment:
      POSTGRES_USER: ${POSTGRES_USER}
      POSTGRES_PASSWORD: ${POSTGRES_PASSWORD}
      POSTGRES_DB: ${POSTGRES_DB}
    restart: unless-stopped
This docker compose file for Outline has all the required options to run Outline with local storage for images, all the secrets and details will be kept in the env file.
The Outline environments are set to use local storage and connections to DB’s.
The file has local disk for DB, Outline and Redis to store all the details. The recommendation is to use a exact version for images in case you don’t want problems when you redeploy this and things update. You want to control your version so in case it gets updated to not mess everything for you.
4. Create The outline env file.
The .env file has all the secrets and variables to have this working in my case it’s looking like below:
POSTGRES_USER='user'
POSTGRES_PASSWORD='pass'
POSTGRES_DB='outline'
SECRET_KEY=d1155bc02c5bfd6b2a4c3313113b0b5f0360366aa3b68c56c5299bc4da4efdf8
UTILS_SECRET=14fec600b3d8b3524421785aef5711805a0a93d21f9ca7f251de88b675862eb
URL=https://docs.bitdoze.com
PORT=3000
SLACK_CLIENT_ID=444642289953.6587112119140
SLACK_CLIENT_SECRET=dbdcb40d85dc3097511179945e2a4bc7
In here you see you have:
- SERVER_IP which is the public IP of the server, I couldn’t make this work with the localhost you can try.
- Postgres users and passwords
- secrets for outline which are generated with:
openssl rand -hex 32 - URL and Port - here you will use what you like for your application
- Slack Details - the
Client IDandClient Secretgenerated in setp 2 can be found here.
Dockge has a UI where you can add all of this and change them in case you need.
5. Deploy Outline
Now you have the docker-compose file and .env details, what remains to be done is to go in dockde and add a name for your stack and hit deploy. Things should start. If you just want to use docker compose to run this you just do:
docker-compose up -dThis will start all the stacks and you can verify them with:
docker ps6. Grant Outline Permissions to Add images
Only with these configs if you try to upload an image will fail as you will not be able to write into the path where images are stored. nodejs user is used by app and needs access there. Outline File Storage documentation has some details about this. To make this working you will need to run:
cd /opt/stacks/outline
chown 1001 ./storage-data
chown with 1001 on the disk path will make sure that the user has permissions there.
7. Configure the CloudFlare Tunnels
You need to let CloudFlare Tunel to know which port is using, you just need to go in the Access - Tunnels and choose the tunnel you created and add a hostname that will link a domain or subdomain and the service and port . This will need to be as for the URL you have set in the .env file.
You can also check Setup CloudPanel as Reverse Proxy with Docker and Dokge to use CloudPanel as a reverse proxy to your Docker containers or How to Use Traefik as A Reverse Proxy in Docker.
And that’s about it, now you can use outline, test it and see how it works.
Conclusions
Outline documentation can be scary if you are a newbie in docker and Linux, this tutorial was simplified so you can start and install Outline as easy as possible to test it and use it. For other configurations and official doc you can check: Outline Docker Installation

