How to Install LangFlow with Docker Compose and Add SSL Over CloudFlare Tunnels
Learn how you can install LangFlow with docker compose and Postgres DB and take advantage of no-code AI flows. Add SSL over CloudFlare tunnels
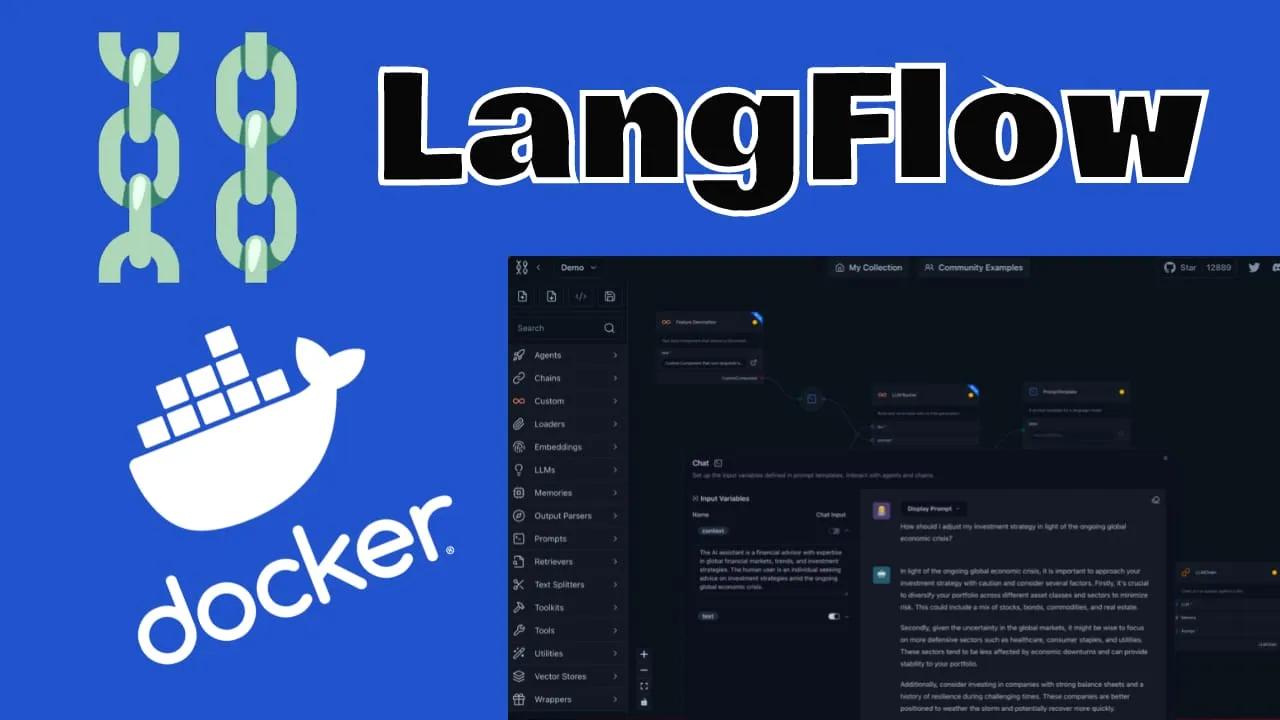
LangFlow is an open-source platform that provides a visual and intuitive way to create, prototype, and deploy AI workflows. It’s designed to make the process of working with large language models (LLMs) more accessible to developers, data scientists, and even non-technical users. By leveraging a drag-and-drop interface, LangFlow allows users to construct complex AI pipelines without diving deep into code.
Comparison with Flowise AI
While LangFlow has gained significant popularity, it’s worth comparing it to another player in the field: Flowise AI. Both platforms aim to simplify AI workflow creation. You can check How to Install FlowiseAI with Docker Compose for more on Flowise
While both platforms offer visual AI workflow creation, LangFlow tends to provide more flexibility and customization options. It’s particularly well-suited for users who need to integrate a wide range of LLMs and tools into their workflows. On the other hand, Flowise AI might be a better choice for those looking for a more streamlined, out-of-the-box solution with a gentler learning curve.
The choice between LangFlow and Flowise AI often comes down to specific project requirements, team expertise, and the desired level of customization. Many organizations find value in experimenting with both platforms to determine which best suits their needs.
If you are interested to see some free cool open source self hosted apps you can check toolhunt.net self hosted section.
Setting Up Langflow with Docker Compose
In case you are interested to monitor server resources like CPU, memory, disk space you can check: How To Monitor Server and Docker Resources
1. Prerequisites
Before you begin, make sure you have the following prerequisites in place:
- VPS where you can host LangFlow, you can use one from Hetzner or use a Mini PC as Home Server
- Docker and Dockge installed on your server, you can check the Dockge - Portainer Alternative for Docker Management for the full tutorial.
- CloudFlare Tunnels are configured for your VPS server, the details are in the article here I deployed Dockge
- OR reverse proxy with CloudPanel you can check: Setup CloudPanel As Reverse Proxy with Docker and Dockge
You can use also Traefik as a reverse proxy for your apps. I have created a full tutorial with Dockge install also to manage your containers on: How to Use Traefik as A Reverse Proxy in Docker
2. Docker Compose File
version: "3.9"
services:
  langflow-db:
    image: postgres:16-alpine
    container_name: Langflow-DB
    hostname: langflow-db
    healthcheck:
      test: ["CMD-SHELL", "pg_isready -U ${POSTGRES_USER} -d ${POSTGRES_DB}"]
      interval: 5s
      timeout: 5s
      retries: 5
    volumes:
      - ./langflow-db:/var/lib/postgresql/data:rw
    environment:
      POSTGRES_DB: ${POSTGRES_DB}
      POSTGRES_USER: ${POSTGRES_USER}
      POSTGRES_PASSWORD: ${POSTGRES_PASSWORD}
    restart: on-failure:5

  langflow:
    image: langflowai/langflow:latest
    container_name: Langflow
    user: root
    ports:
      - 5060:7860
    healthcheck:
      test: timeout 10s bash -c ':> /dev/tcp/127.0.0.1/7860' || exit 1
      interval: 10s
      timeout: 5s
      retries: 3
      start_period: 90s
    restart: on-failure:5
    depends_on:
      - langflow-db
    environment:
      LANGFLOW_DATABASE_URL: postgresql://${POSTGRES_USER}:${POSTGRES_PASSWORD}@langflow-db:5432/${POSTGRES_DB}?sslmode=disable
      LANGFLOW_CONFIG_DIR: /var/lib/langflow
      LANGFLOW_SUPERUSER: ${LANGFLOW_SUPERUSER}
      LANGFLOW_SUPERUSER_PASSWORD: ${LANGFLOW_SUPERUSER_PASSWORD}
      LANGFLOW_AUTO_LOGIN: False
    volumes:
      - ./langflow:/var/lib/langflow:rw
Let’s break down this Docker Compose file and explain what each section is doing:
-
Version: The
version: "3.9"specifies the version of the Docker Compose file format we’re using. -
Services: We define two services -
langflow-dbandlangflow. -
langflow-db service:
- Uses the
postgres:16-alpineimage, which is a lightweight PostgreSQL database. - Sets up a health check to ensure the database is ready before other services start.
- Mounts a volume to persist database data.
- Uses environment variables for database configuration.
- Restarts on failure, with a maximum of 5 attempts.
- Uses the
-
langflow service:
- Uses the latest LangFlow image.
- Exposes port 5060 on the host, mapping to port 7860 in the container.
- Implements a health check to verify the service is running correctly.
- Depends on the
langflow-dbservice, ensuring the database is up before starting. - Sets various environment variables for LangFlow configuration.
- Mounts a volume for persistent storage of LangFlow data.
This configuration allows for a robust and scalable LangFlow setup, with separate containers for the application and its database, health checks to ensure reliability, and persistent storage for both the database and LangFlow data.
3 .env file for LangFlow
To keep our sensitive information secure and our configuration flexible, we’ll use a .env file to store environment variables. Create a file named .env in the same directory as your docker-compose.yml with the following content:
POSTGRES_USER='user'
POSTGRES_PASSWORD='pass'
POSTGRES_DB='langflow'
LANGFLOW_SUPERUSER=bitdoze
LANGFLOW_SUPERUSER_PASSWORD=bitdoze
This file sets up the necessary environment variables for our PostgreSQL database and LangFlow superuser. Remember to replace these placeholder values with secure, unique values for your production environment.
4. Deploy The Docker Compose File for LangFlow
With our docker-compose.yml and .env files in place, we’re ready to deploy LangFlow. Open a terminal, navigate to the directory containing these files, and run:
docker-compose up -dThis command will start our LangFlow setup in detached mode, allowing it to run in the background.
5. Implementing SSL with CloudFlare Tunnels
CloudFlare Tunnels offer a innovative solution for securely connecting your web applications to the internet without the need for public IP addresses or opening inbound ports on your firewall. This service, part of CloudFlare’s suite of security and performance tools, provides a secure tunnel between your origin server and CloudFlare’s edge network.
CloudFlare Tunnels operate on a simple yet powerful principle:
- Outbound Connection: Your server initiates an outbound connection to CloudFlare’s network using the CloudFlare daemon (cloudflared).
- Tunnel Creation: This connection establishes a secure tunnel between your origin and CloudFlare’s edge.
- Traffic Routing: Incoming requests to your domain are routed through this tunnel to your origin server.
- Response Delivery: Responses from your server are sent back through the tunnel and delivered to the user.
This process effectively eliminates the need for traditional port forwarding or firewall configuration, as all traffic flows through the secure tunnel.
Go in Access - Tunnels and choose the tunnel you created and add a hostname that will link a domain or subdomain and the service and port.

You can also check Setup CloudPanel as Reverse Proxy with Docker and Dokge to use CloudPanel as a reverse proxy to your Docker containers or How to Use Traefik as A Reverse Proxy in Docker.
6. Access the LangFlow UI
After you set the CloudFlare tunnels you can go and access you LangFlow UI and start building your first flow. You can logun with the user and password that you have set in the .env file.

By following this guide, you’ve successfully set up LangFlow using Docker Compose, configured it with a PostgreSQL database for persistence, and secured it with SSL through CloudFlare Tunnels. This setup provides you with a powerful, flexible, and secure environment for creating and managing AI workflows.
LangFlow’s visual interface makes it easier to experiment with different AI models and create complex workflows without deep coding knowledge. As you explore its capabilities, you’ll find it to be a valuable tool for prototyping AI applications and streamlining your development process.
If you’re interested in exploring more Docker containers for your home server or self-hosted setup, including other AI and productivity tools, check out our comprehensive guide on Best 100+ Docker Containers for Home Server. This resource provides a wealth of options for various applications and services you can run using Docker, helping you build a powerful and versatile self-hosted environment.
Related Posts

Langfuse Docker Install: Self Hosted LangSmith Alternative
Learn how you can install Langfuse with docker compose and Postgres DB and take advantage of the observability software for your AI apps.
How to Install Outline Wiki on Docker
Learn how you can install Outline Wiki with docker compose to have a self hosted notion alternative.

How to Setup Ollama with Open-Webui using Docker Compose
Learn how to Setup Ollama with Open-WebUI using Docker Compose and have your own local AI