Deploy a Python uv Project with Git and Railpack in Dokploy
Deploy a Python uv project in Dokploy with Railpack: a step-by-step Git-based guide for FastHTML apps, covering port setup, build types, and 502 fixes.
 Dragos12 min read
You can deploy a Python uv project in Dokploy with Railpack as the build provider. No Dockerfile needed. Push to Git, and Dokploy builds and serves your app automatically via Docker and Traefik.
This guide covers a FastHTML app from project init with uv, through Railpack’s zero-config detection, to port configuration (the part that trips most people up) and the failure modes you’ll hit. If you’re new to uv, check the Getting Started with uv guide. For FastHTML basics, see FastHTML for Beginners. If Dokploy isn’t installed yet, follow the Dokploy installation guide first.
Dokploy’s core is Apache-2.0 (free to self-host). A managed Dokploy Cloud option exists from $4.50/mo per server if you’d rather not maintain it yourself.
What are Dokploy, Railpack, and uv?
uv is a Rust-based Python package manager from Astral. It’s 10 to 100x faster than pip at resolving and installing dependencies, and it replaces pip, Poetry, pyenv, and virtualenv. It uses pyproject.toml for configuration and uv.lock for reproducible installs. If you’re picking from the best Python web frameworks, uv works with all of them.
Railpack is a build provider from the Railway team. It auto-detects your project type, installs dependencies, and produces a deployable container. For Python, Railpack recognizes projects when files like main.py, app.py, pyproject.toml, or requirements.txt exist at the repo root. When it finds both pyproject.toml and uv.lock, it uses uv as the package manager automatically.
Dokploy is a self-hosted deployment platform (around 36.7k GitHub stars) that orchestrates Docker containers with Traefik for routing. It supports Git-based deploys and multiple build types: Railpack, Nixpacks, and Dockerfile. It’s one of the best self-hosted server panels if you want PaaS convenience without giving up control. Core is Apache-2.0; future paid features are source-available. Dokploy Cloud starts at $4.50/mo/server (Hobby tier).
Step-by-step: deploy a Python uv project with Railpack in Dokploy
Deploy a FastHTML app from scratch. The flow is: create the project, push to Git, configure Dokploy, deploy.
Prerequisites
- Dokploy installed on a VPS (follow the Dokploy installation guide)
- uv installed locally, version ≥0.12.0 (
curl -LsSf https://astral.sh/uv/install.sh | sh) - Git installed locally and a repository (GitHub, GitLab, Gitea, etc.)
- A VPS to run Dokploy. Hetzner Cloud starts at ~€4.50/mo and is a solid choice for self-hosting. Hostinger VPS is another affordable option.
- Access to your Dokploy dashboard (e.g.,
http://your-server-ip:3000)
Note on uv versions: Starting with uv 0.12.0 (July 2026),
uv initcreates a packaged project layout by default (source undersrc/, a build system, entry points). We’ll useuv init --no-packageto get the flat layout that Railpack expects at the repo root.
Step 1: set up your uv-managed Python project
Initialize a project with the flat (no-package) layout, then add FastHTML:
uv init --no-package my-fasthtml-app
cd my-fasthtml-app
uv add python-fasthtml
This gives you:
my-fasthtml-app/
├── .python-version  # e.g., "3.12"
├── main.py          # Entry point
├── pyproject.toml   # Project config
├── uv.lock          # Locked dependencies
└── README.md
Note: you don’t need to manually create a virtualenv or run source .venv/bin/activate. uv handles this automatically when you use uv add or uv run.
Write a minimal FastHTML app in main.py:
from fasthtml.common import *

app, rt = fast_app()

@rt("/")
def get():
    return Div(P("Hello from uv and Dokploy!"))

serve()
Test locally:
uv run main.pyVisit http://localhost:5001 to verify it works. The serve() function binds port 5001 locally. This is for development only. In production, Railpack uses a different start command (covered in Step 2).
Push to Git:
git init
git add .
git commit -m "initial commit"
git branch -M main
git remote add origin [email protected]:user/my-fasthtml-app.git
git push -u origin main
Step 2: understand Railpack’s auto-detection
For a basic uv + FastHTML project, you don’t need a railpack.json. Zero config. Here’s what Railpack does automatically:
Detection: Railpack recognizes Python projects when any of these files exist at the repo root: main.py, app.py, start.py, bot.py, hello.py, server.py, requirements.txt, pyproject.toml, or Pipfile.
Package manager selection: When both pyproject.toml and uv.lock are present, Railpack uses uv to install dependencies.
Python version resolution (in priority order):
RAILPACK_PYTHON_VERSIONenvironment variable.python-version,.tool-versions, ormise.tomlruntime.txtPipfile- Default: 3.13.2
FastHTML start command: When Railpack detects python-fasthtml as a dependency and uvicorn is available (it is, FastHTML depends on it), it starts the app with:
uvicorn main:app --host 0.0.0.0 --port ${PORT:-8000}FastHTML start command
Railpack automatically starts FastHTML apps with uvicorn on port 8000, not python main.py. This means the serve() call in your main.py is only used for local development. In production, uvicorn imports the module directly. serve() never executes.
Runtime variables Railpack sets automatically: PYTHONUNBUFFERED=1, PYTHONFAULTHANDLER=1, PYTHONHASHSEED=random, PYTHONDONTWRITEBYTECODE=1, PIP_DISABLE_PIP_VERSION_CHECK=1, PIP_DEFAULT_TIMEOUT=100.
Optional: custom railpack.json
If you need to override the start command or add build-time packages, create a railpack.json at the repo root:
{
  "$schema": "https://schema.railpack.com",
  "provider": "python",
  "deploy": {
    "startCommand": "uvicorn main:app --host 0.0.0.0 --port 8000"
  }
}
For most uv + FastHTML projects, skip this file entirely.
Step 3: set up Dokploy with Git (port = 8000)
Deploy using Dokploy’s Git integration with Railpack as the build type.
-
Log in to Dokploy. Open your dashboard (e.g.,
http://your-server-ip:3000). -
Create a new project. Go to Projects > New Project, name it
my-uv-app, and save. -
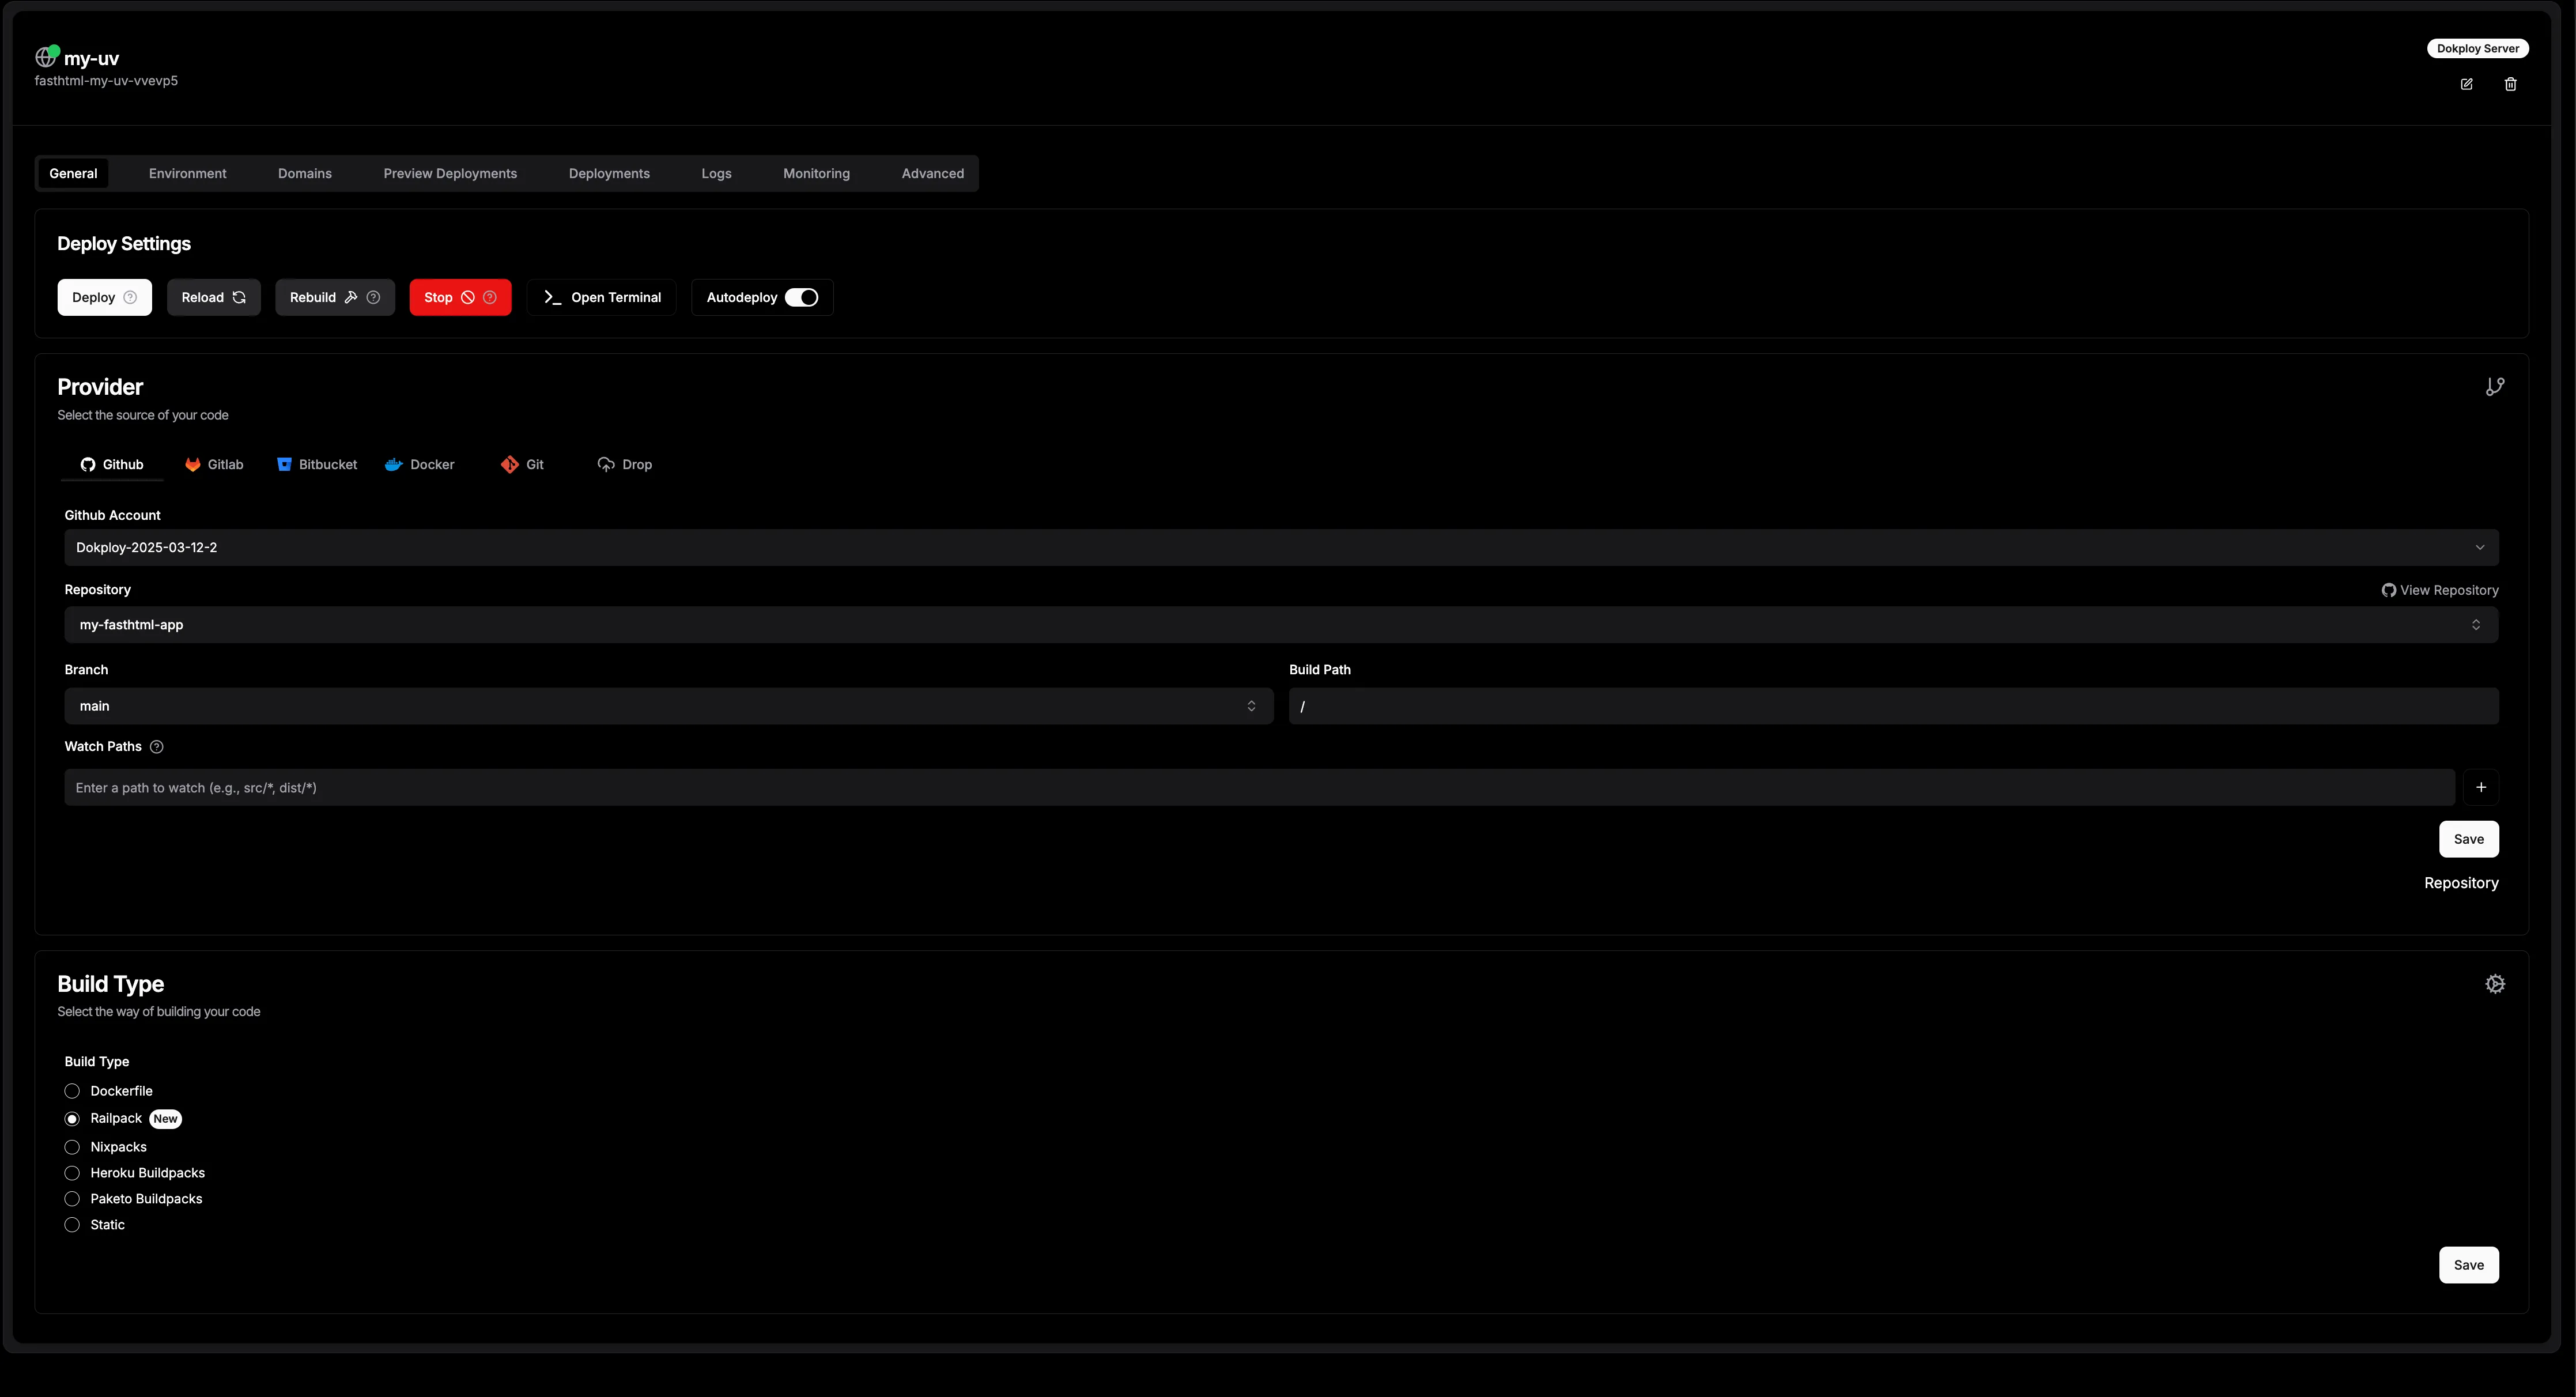
Add an application. Inside the project, you’ll see a default
productionenvironment (Dokploy introduced Environments in v0.25.0). Add a new application:- Name:
my-uv-app - Git Repository:
https://github.com/yourusername/my-fasthtml-app.git - Branch:
main - Build Type: Railpack
- Save.
- Name:
- Set the port to 8000. In the application settings, set the port field to 8000. This matches Railpack’s
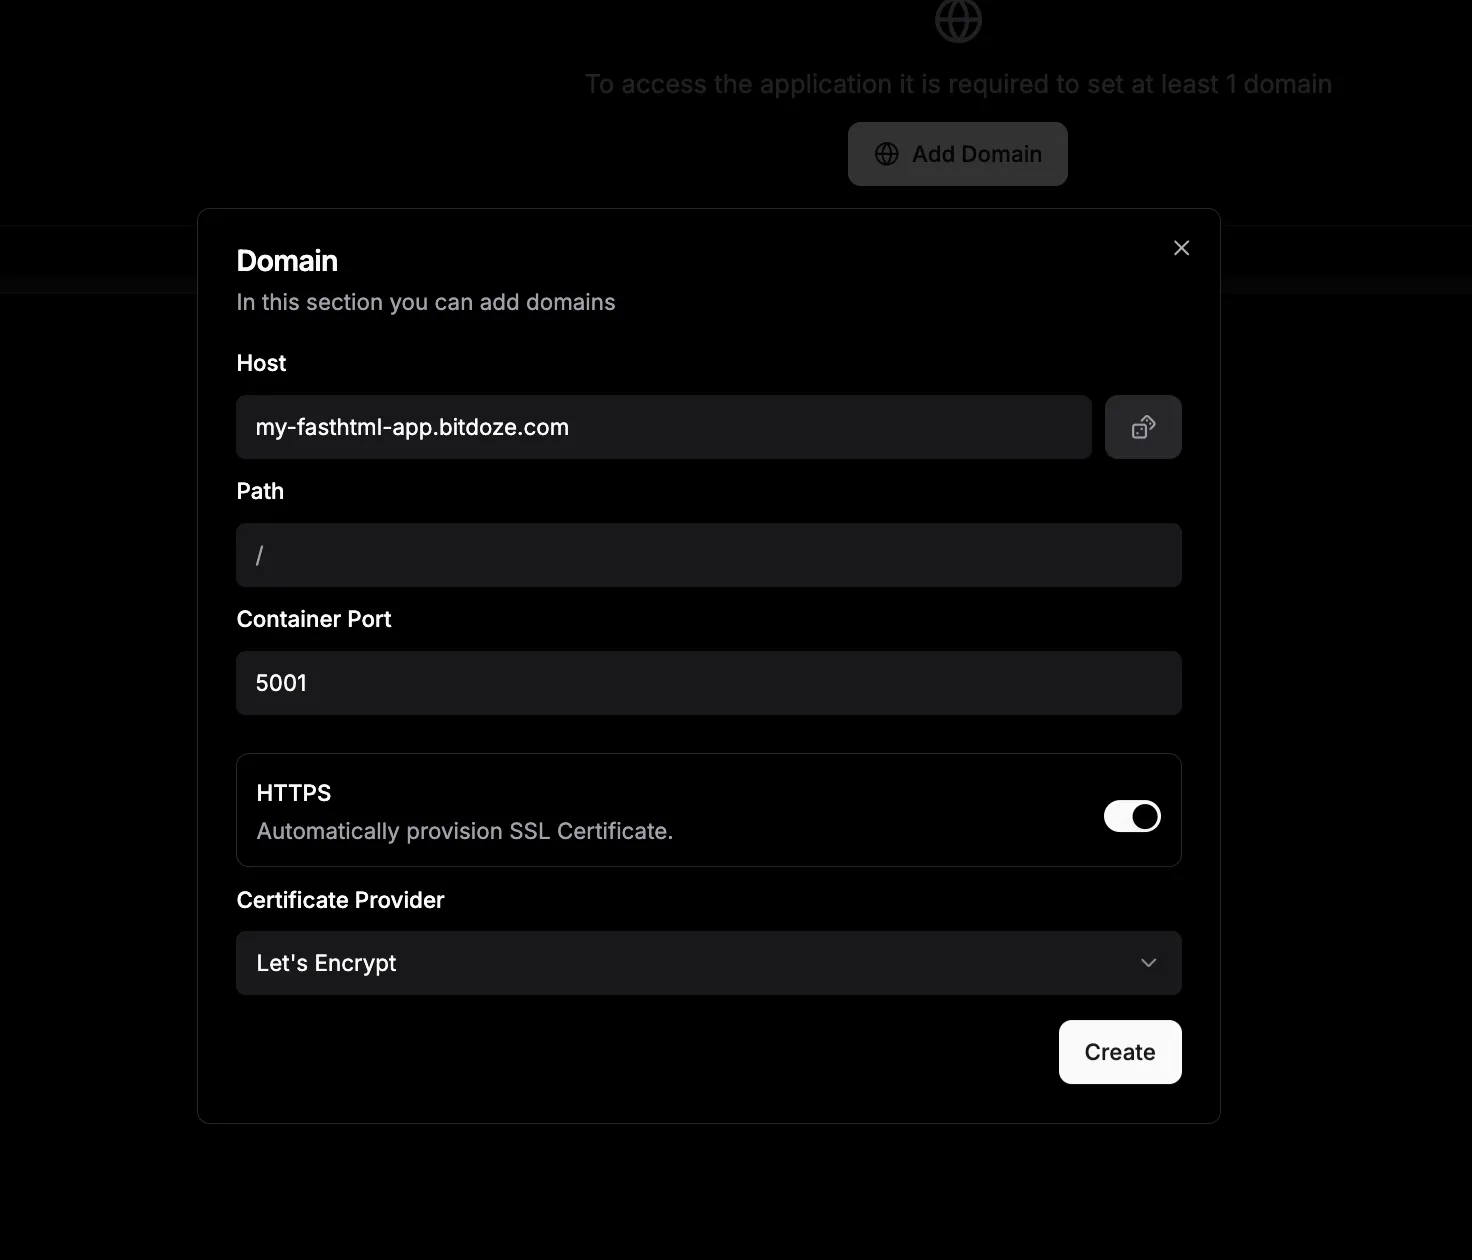
${PORT:-8000}default for FastHTML apps. Dokploy uses Traefik as a reverse proxy to route traffic. If the port doesn’t match what the container listens on, you’ll get 502 errors.
Port mismatch is the #1 deployment failure
Railpack starts FastHTML on port 8000. If your Dokploy domain is configured for a different port (or the default), you’ll get 502/504 errors. Always set the port to 8000 for FastHTML apps.
- Set up a domain. In the Domains tab, add your custom domain (e.g.,
my-uv-app.yourdomain.com). Make sure the port matches (8000). Enable HTTPS. Dokploy handles the Traefik routing and certificate generation automatically.
-
Add environment variables (optional). In the Environment tab, add any env vars your project needs.
-
Deploy. Click Deploy. Dokploy clones the repo, Railpack builds the image, and the container starts.
Step 4: verify the deployment
-
Check build logs. In the Logs tab, look for
uv sync(install step) followed byUvicorn running on http://0.0.0.0:8000. -
Test the app. Visit your URL (e.g.,
https://my-uv-app.yourdomain.com). You should see the FastHTML response:<div><p>Hello from uv and Dokploy!</p></div>. -
If you get 502/504, the port is almost certainly wrong. Go back to Step 3 and verify the port is set to 8000. See the Troubleshooting section below for more failure modes.
Step 5: automate future deployments
- Enable auto-deploy. In the application settings, enable Auto Deploy for the
mainbranch. - Push an update. Edit
main.py:
@rt("/")
def get():
    return Div(P("Updated: Hello from uv and Dokploy!"))
git add main.py
git commit -m "update greeting"
git push origin mainDokploy detects the push and redeploys automatically.
Railpack vs Nixpacks vs Dockerfile: which build type?
Dokploy supports five build types. Here’s how to choose for a Python project:
Railpack is the recommended build type for uv projects. It auto-detects your project type, selects uv as the package manager when pyproject.toml + uv.lock are present, and handles FastHTML’s start command automatically. Zero config for most cases.
Choose Railpack when you want the simplest deployment path and don’t need fine-grained control over the build image.
You can pin the Railpack version in Dokploy (e.g., 0.37.0) to prevent build drift as Railpack releases updates.
For more details on how Railpack compares to the older Nixpacks, see Railpack vs. Nixpacks.
Nixpacks was the original default build type in Dokploy. It’s still available and works for Python projects, but Railpack has largely superseded it with better uv support and faster builds.
Choose Nixpacks if you have an existing project configured for it and don’t want to switch. For new projects, start with Railpack.
Dockerfile gives you maximum control. You define every layer, every dependency, every optimization. For production Python apps, a multi-stage Dockerfile with uv sync --frozen is the most reproducible option.
Choose Dockerfile when you need custom system dependencies, specific base images, or multi-stage builds for smaller images. See how to deploy a Docker Compose app in Dokploy for the full Docker-based workflow.
FROM python:3.12-slim AS builder
COPY --from=ghcr.io/astral-sh/uv:latest /uv /usr/local/bin/uv
WORKDIR /app
COPY pyproject.toml uv.lock ./
RUN uv sync --frozen --no-dev
COPY . .
CMD ["uv", "run", "uvicorn", "main:app", "--host", "0.0.0.0", "--port", "8000"]
For a comparison of Dokploy with other platforms, see Coolify vs Dokploy vs Kamal 2.
FastHTML deployment notes: ports and start command
The local-vs-production port difference is the most common source of confusion:
- Locally:
serve()inmain.pybinds port 5001. This is for development. - In production: Railpack detects FastHTML and runs
uvicorn main:app --host 0.0.0.0 --port ${PORT:-8000}. Theserve()call never executes because uvicorn imports the module directly. Port 8000 is the production default.
Local vs production ports
Locally your app runs on port 5001 via serve(). In production Railpack uses uvicorn on port 8000. These are different — don’t confuse them when configuring Dokploy domains. Set the Dokploy port to 8000.
If you need a different production port, set the PORT environment variable in Dokploy’s Environment tab, or override the start command in railpack.json.
uvicorn is available at runtime because python-fasthtml depends on it — you don’t need to add it separately.
Troubleshooting Dokploy + Railpack deploys
502/504 after deploy
Cause: Port mismatch. FastHTML/uvicorn listens on port 8000, but the Dokploy domain is configured for a different port (or the default).
Fix: Go to the application’s Domains tab and verify the port field is set to 8000. Save and redeploy.
uv: command not found during build
Cause: Railpack didn’t detect a uv project. This happens when uv.lock is missing or not committed.
Fix: Make sure both pyproject.toml AND uv.lock are committed to the repo, and that a detection file (main.py, app.py, pyproject.toml, etc.) exists at the repo root. Run uv lock locally if uv.lock is missing, then commit and push.
Python version too new / build fails
Cause: Railpack installs precompiled CPython via Mise. Very new Python releases may not have a precompiled binary yet, and the build fails.
Fix: Pin a supported Python version in .python-version (e.g., 3.12 or 3.13). Alternatively, set the environment variable MISE_PYTHON_COMPILE=1 in Dokploy to compile Python from source (slower builds, but works with any version).
Missing system/native dependencies
Cause: Your Python package needs a system library (e.g., libpq for PostgreSQL, opencv needs libgl). Railpack auto-installs some common ones (libpq, ffmpeg), but not all.
Fix: Set RAILPACK_BUILD_APT_PACKAGES (for build-time deps) or RAILPACK_DEPLOY_APT_PACKAGES (for runtime deps) as environment variables in Dokploy. Example: RAILPACK_DEPLOY_APT_PACKAGES=libpq-dev.
Playwright browser tests fail
Cause: Browser binaries are not installed by default (to avoid bloating images). This changed in Railpack v0.35.0.
Fix: Set the environment variable RAILPACK_PYTHON_PLAYWRIGHT_INSTALL=1 in Dokploy, then redeploy.
Backups and data safety
If your app persists data, set up backups. See Dokploy backups with Cloudflare R2 for a guide on automated backups to S3-compatible storage.
Why use Dokploy with uv and Railpack?
- Self-hosted control. Your VPS, your data, your rules. Apache-2.0 core, no vendor lock-in.
- Speed. uv’s dependency resolution is 10 to 100x faster than pip. Railpack’s builds are fast. Push to deploy in seconds, not minutes.
- Automation. Git push triggers auto-deploy. No manual CI/CD pipeline to maintain.
- Reproducibility.
uv.lock+.python-version+ Railpack version pinning = consistent builds across environments. - Cost. Self-hosted Dokploy is $0 beyond your VPS cost. A basic VPS on Hetzner Cloud costs ~€4.50/mo. That’s your entire infrastructure cost. Managed Dokploy Cloud is $4.50/mo/server if you prefer not to self-host.
- Rollback. Redeploy a previous Git commit, or switch build types if something breaks. No irreversible migrations.
For updating your deployed apps, see how to update Docker Compose stacks in Dokploy.
Conclusion
Deploy a Python uv project in Dokploy with Railpack and the flow is: uv init --no-package → add your framework → push to Git → Dokploy + Railpack build and deploy automatically. Set port 8000 in the domain config, and you’re live. No Dockerfile needed.
This is a zero-config path for Python self-hosting. For more control over build layers, base images, or system dependencies, a Dockerfile or Docker Compose is the next step — see how to update Docker Compose stacks in Dokploy for that workflow.
Pin your Railpack version, commit your uv.lock, and verify the port. Those three things prevent 90% of deployment failures.