How To Deploy A Docker Compose App in Dokploy
Learn how you can deploy a docker compose self hosted app in dokploy and host any application you want.

Dokploy is an open-source, self-hostable Platform as a Service (PaaS) that simplifies the deployment and management of applications and databases using Docker and Traefik. It serves as a free alternative to popular platforms like Vercel, Heroku, and Netlify, offering robust features for developers who prefer to manage their own infrastructure.
Dokploy Features
- Applications: Deploy any type of application (Node.js, PHP, Python, Go, Ruby, etc.) with ease.
- Databases: Create and manage databases with support for MySQL, PostgreSQL, MongoDB, MariaDB, Redis, and more.
- Docker Management: Easily deploy and manage Docker containers.
- Traefik Integration: Automatically integrates with Traefik for routing and load balancing.
- Real-time Monitoring: Monitor CPU, memory, storage, and network usage.
- Database Backups: Automate backups with support for multiple storage destinations.
I have already made a complete article of how you can install and configure Dokploy on your own VPS server you can check it for more details. Now we are going to see how you can use Dokploy to deploy any self-hosted app with the help of docker compose. Dokploy has some templates but maybe you don’t find all the apps in there and that’s why you may want to deploy an app with docker compose.
In case you are interested to monitor server resources like CPU, memory, disk space you can check: How To Monitor Server and Docker Resources
How To Deploy A Docker Compose App in Dokploy
Things are not complicated at all as it is using Traefik under the hood which makes things easey to do. If you want to learn more about Traefik you can check:
- How to Use Traefik as A Reverse Proxy in Docker
- Traefik FREE Let’s Encrypt Wildcard Certificate With CloudFlare Provider
Now let’s get started and see what’s needs to be done, this is the Dokploy official doc if you need something more: Docker Compose Setup, Example
1. Point The Domain to Server IP
The first thing is to be sure that the domain or subdomain is pointing to your server IP address where you have Dokploy set up:
- Add an A record to your DNS settings:
-
- Name: Enter the route you want to point to (e.g., app for app.yourdomain.com).
-
- Value: Type in the IP address of your server, such as 1.2.3.4.

2. Prepare the Docker Compose File For Dokploy
The docker compose file needs to be modified to work with dokploy, you need to add the dokploy-network, add the volumes in case something is used and traefik labels to work with Dokploy. Below is an complete file for Flowise AI which I instaled several times before with CloudFlare Tunnels or with Traefik.
services:
  flowise-db:
    image: postgres:16-alpine
    networks:
      - dokploy-network
    environment:
      POSTGRES_DB: ${POSTGRES_DB}
      POSTGRES_USER: ${POSTGRES_USER}
      POSTGRES_PASSWORD: ${POSTGRES_PASSWORD}
    volumes:
      - flowise-db-data:/var/lib/postgresql/data
    restart: unless-stopped
    healthcheck:
      test: ["CMD-SHELL", "pg_isready -U ${POSTGRES_USER} -d ${POSTGRES_DB}"]
      interval: 5s
      timeout: 5s
      retries: 5

  flowise:
    image: flowiseai/flowise:latest
    healthcheck:
      test: wget --no-verbose --tries=1 --spider http://localhost:${PORT}
    volumes:
      - flowiseai:/root/.flowise
    environment:
      DEBUG: false
      PORT: ${PORT}
      FLOWISE_USERNAME: ${FLOWISE_USERNAME}
      FLOWISE_PASSWORD: ${FLOWISE_PASSWORD}
      APIKEY_PATH: /root/.flowise
      SECRETKEY_PATH: /root/.flowise
      LOG_LEVEL: info
      LOG_PATH: /root/.flowise/logs
      DATABASE_TYPE: postgres
      DATABASE_PORT: 5432
      DATABASE_HOST: flowise-db
      DATABASE_NAME: ${POSTGRES_DB}
      DATABASE_USER: ${POSTGRES_USER}
      DATABASE_PASSWORD: ${POSTGRES_PASSWORD}
    restart: on-failure:5
    networks:
      - dokploy-network
    depends_on:
      flowise-db:
        condition: service_healthy
    entrypoint: /bin/sh -c "sleep 3; flowise start"
    labels:
      - "traefik.enable=true"
      - "traefik.http.routers.flowiseai.rule=Host(`flowise.domain.com`)"
      - "traefik.http.routers.flowiseai.entrypoints=websecure"
      - "traefik.http.routers.flowiseai.tls.certResolver=letsencrypt"
      - "traefik.http.services.flowiseai.loadbalancer.server.port=3000"

volumes:
  flowiseai:
    driver: local
  flowise-db-data:
    driver: local

networks:
  dokploy-network:
    external: true
In here you see that I have aded the dokploy-network my vars and everything. Also the labes are per their specifications:
labels:
  - "traefik.enable=true"
  - "traefik.http.routers.<unique-name>.entrypoints=websecure"
  - "traefik.http.routers.<unique-name>.tls.certResolver=letsencrypt"
  - "traefik.http.routers.<unique-name>.rule=Host(`app.yourdomain.com`)"
  - "traefik.http.services.<unique-name>.loadbalancer.server.port=3000"
You need to add the Host and Port for your app, in my case the app is using internaly the 3000 port.
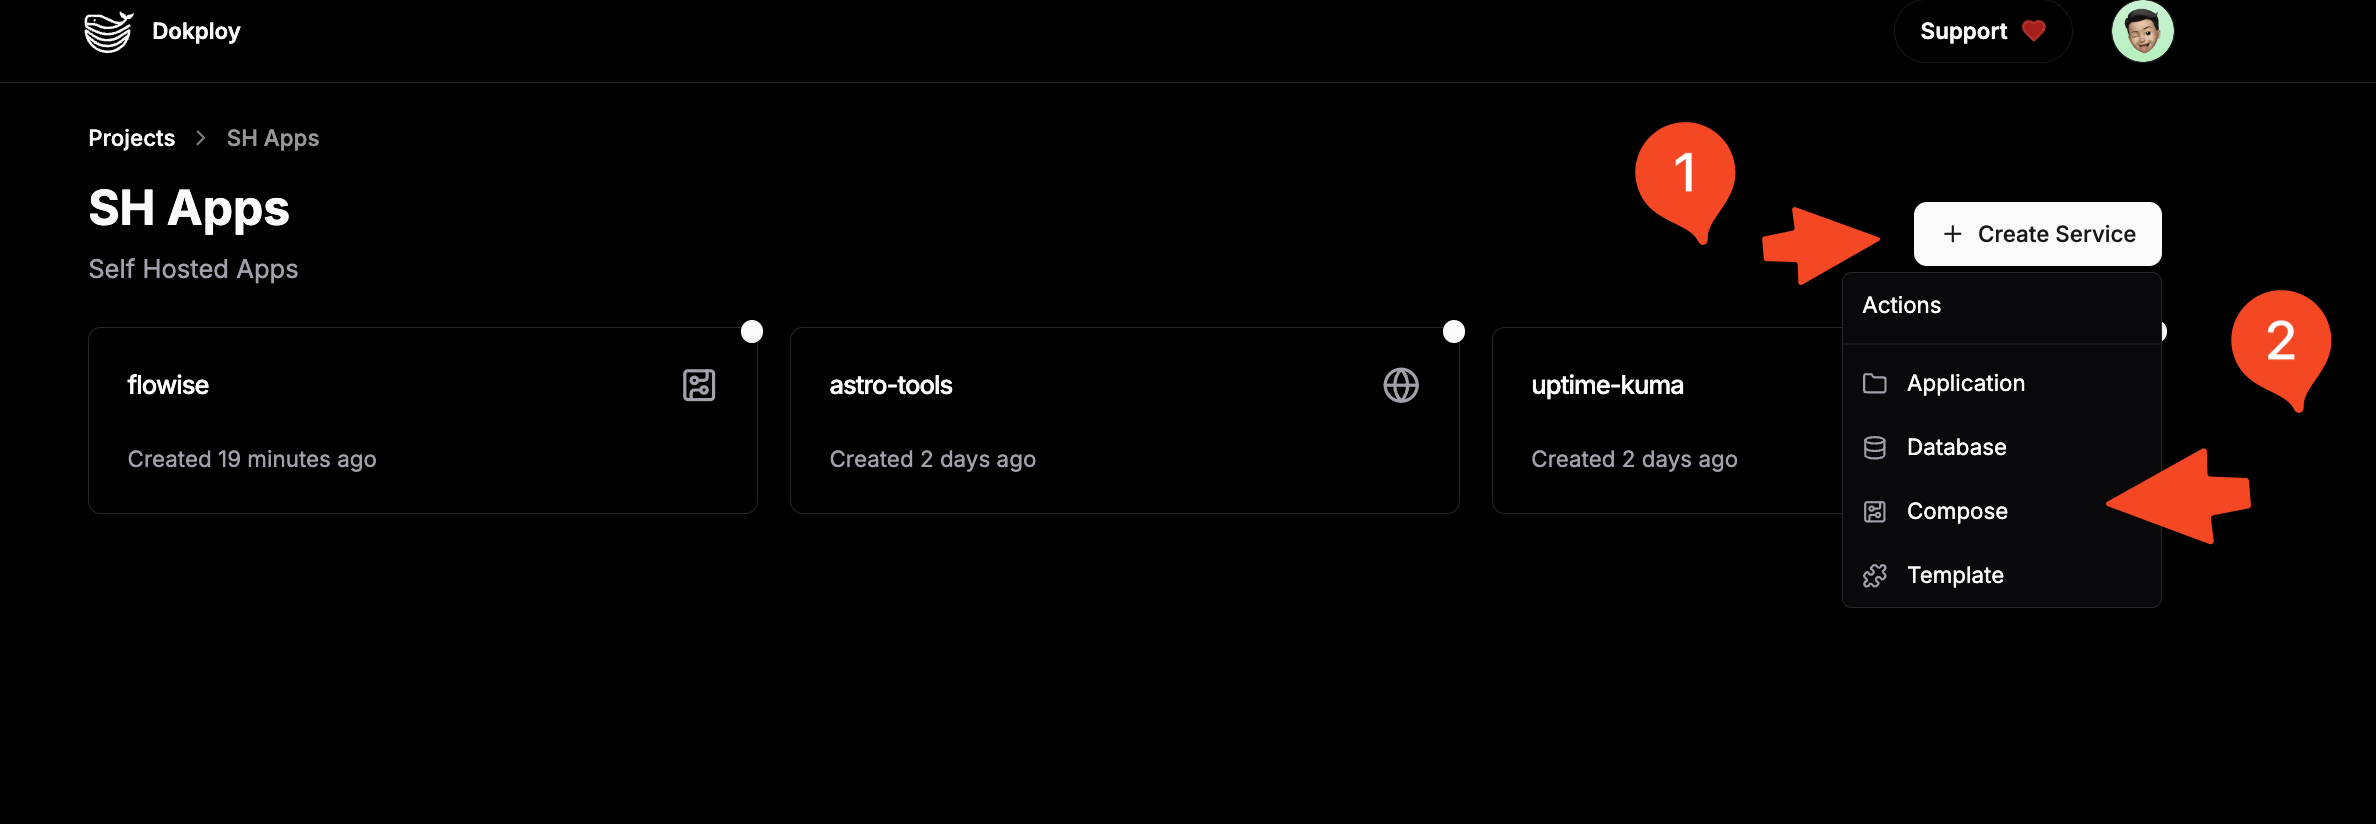
With this file modified with your details you create a new project in Dokploy if you didn’t already and hit Create Service - Compose

After you go and select the project abd you go to General - Raw and paste your compose file and save it.
Don’t add any container name as it can cause issues with logs as per Dokploy doc
3. Add Env Variables
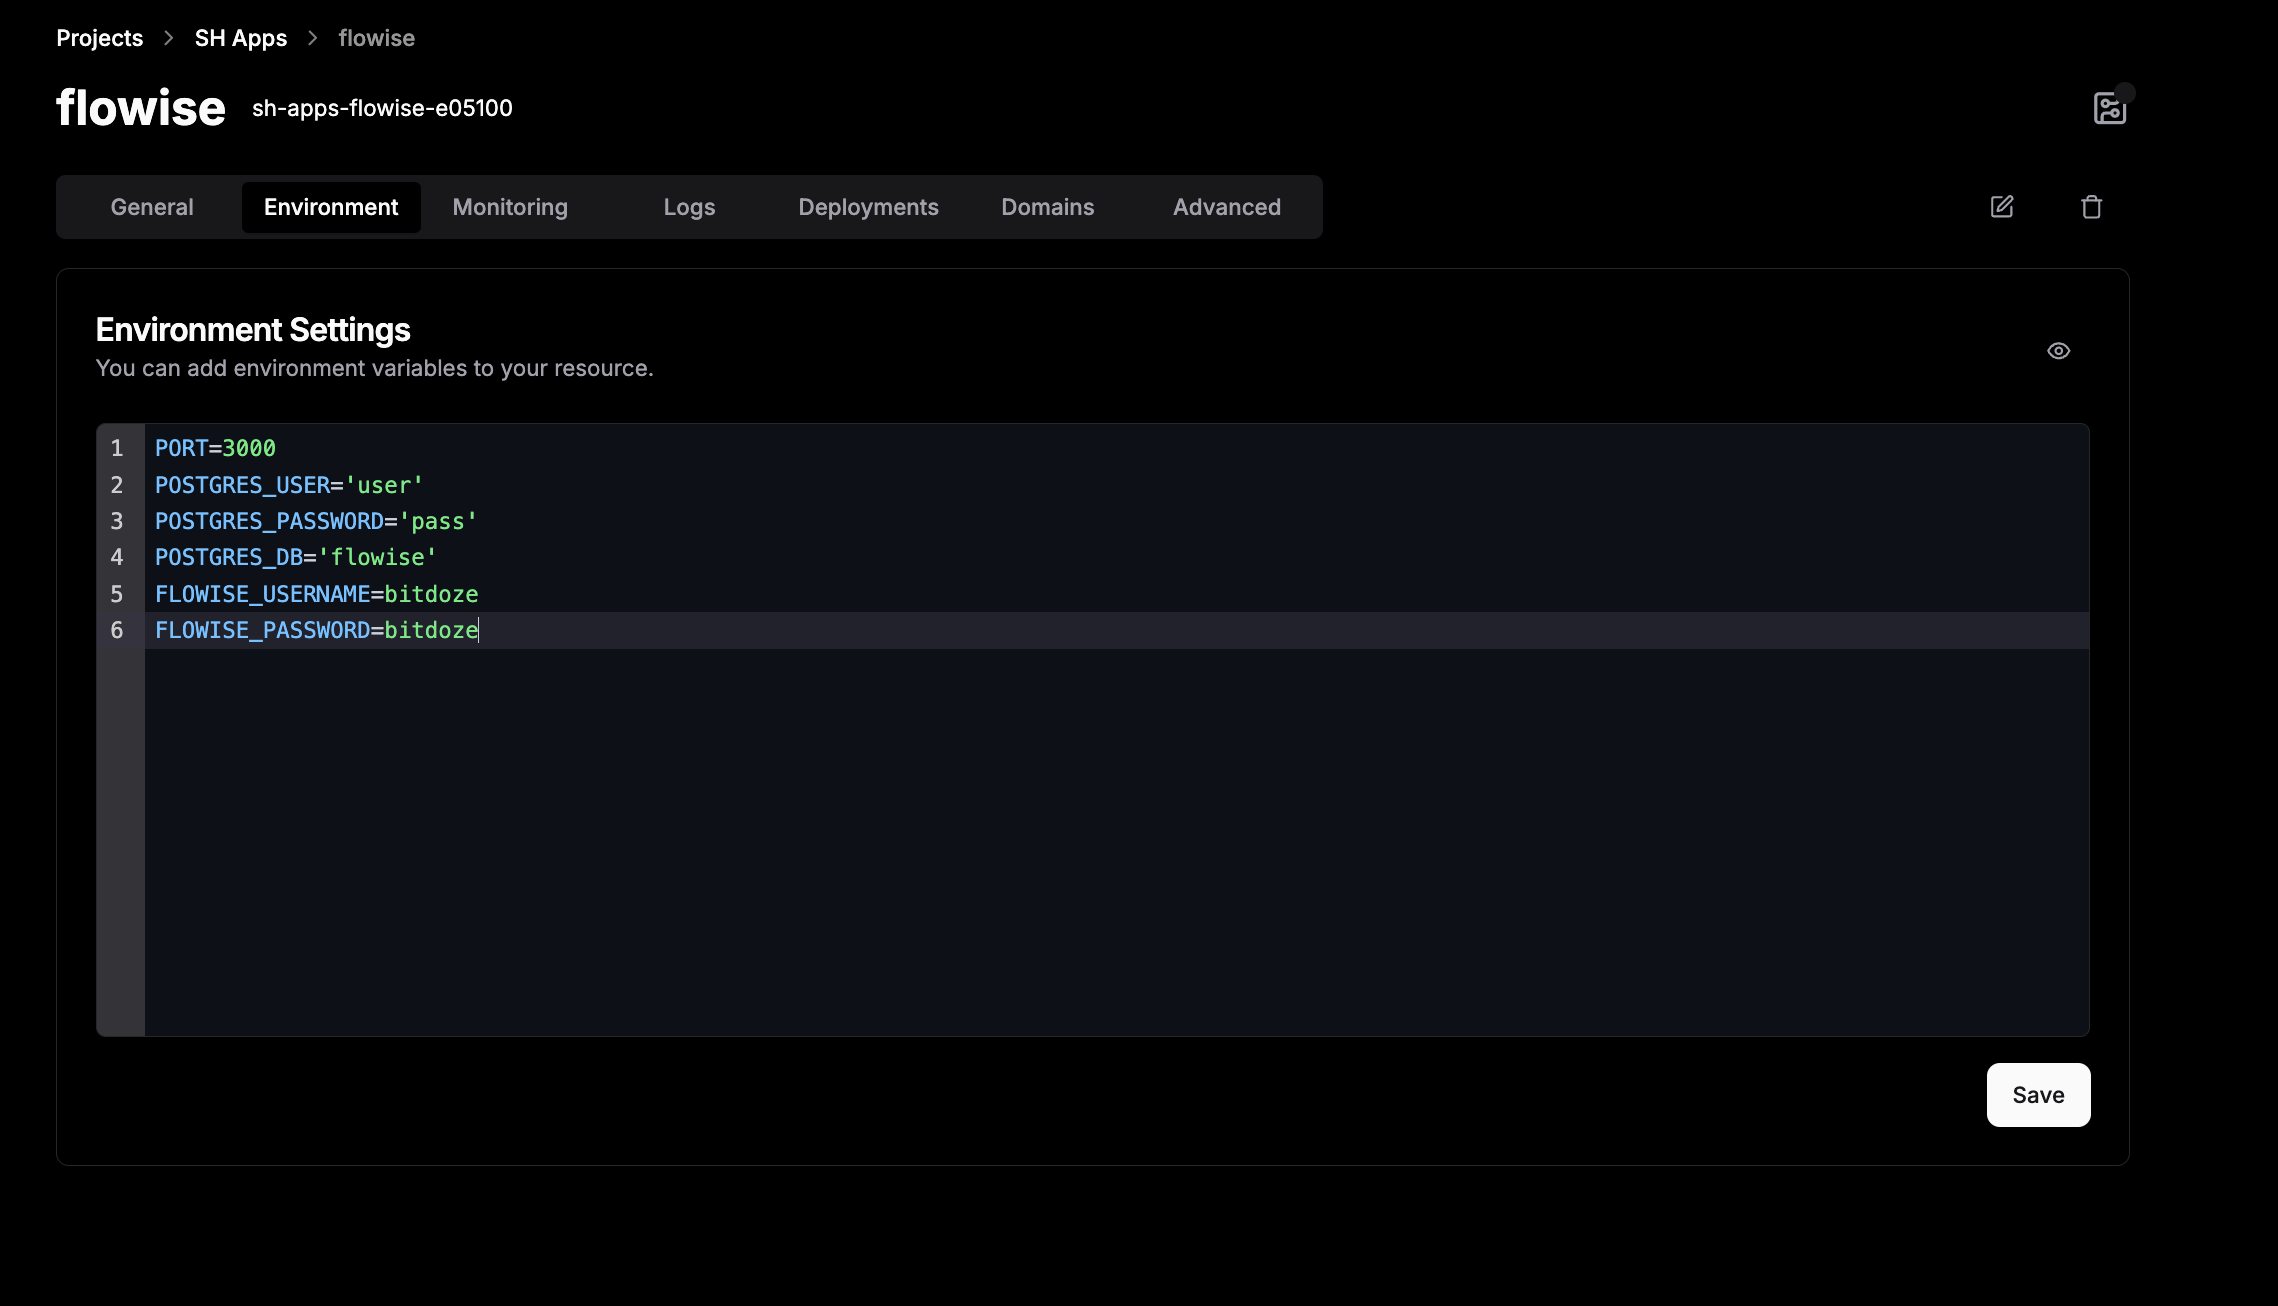
In the above example I am using .env vars to store some users and passwords, Dokploy can easely be used to add variables in environment tab.
PORT=3000
POSTGRES_USER='user'
POSTGRES_PASSWORD='pass'
POSTGRES_DB='flowise'
FLOWISE_USERNAME=bitdoze
FLOWISE_PASSWORD=bitdoze
4. (Optional) Use Domains to deploy the domain
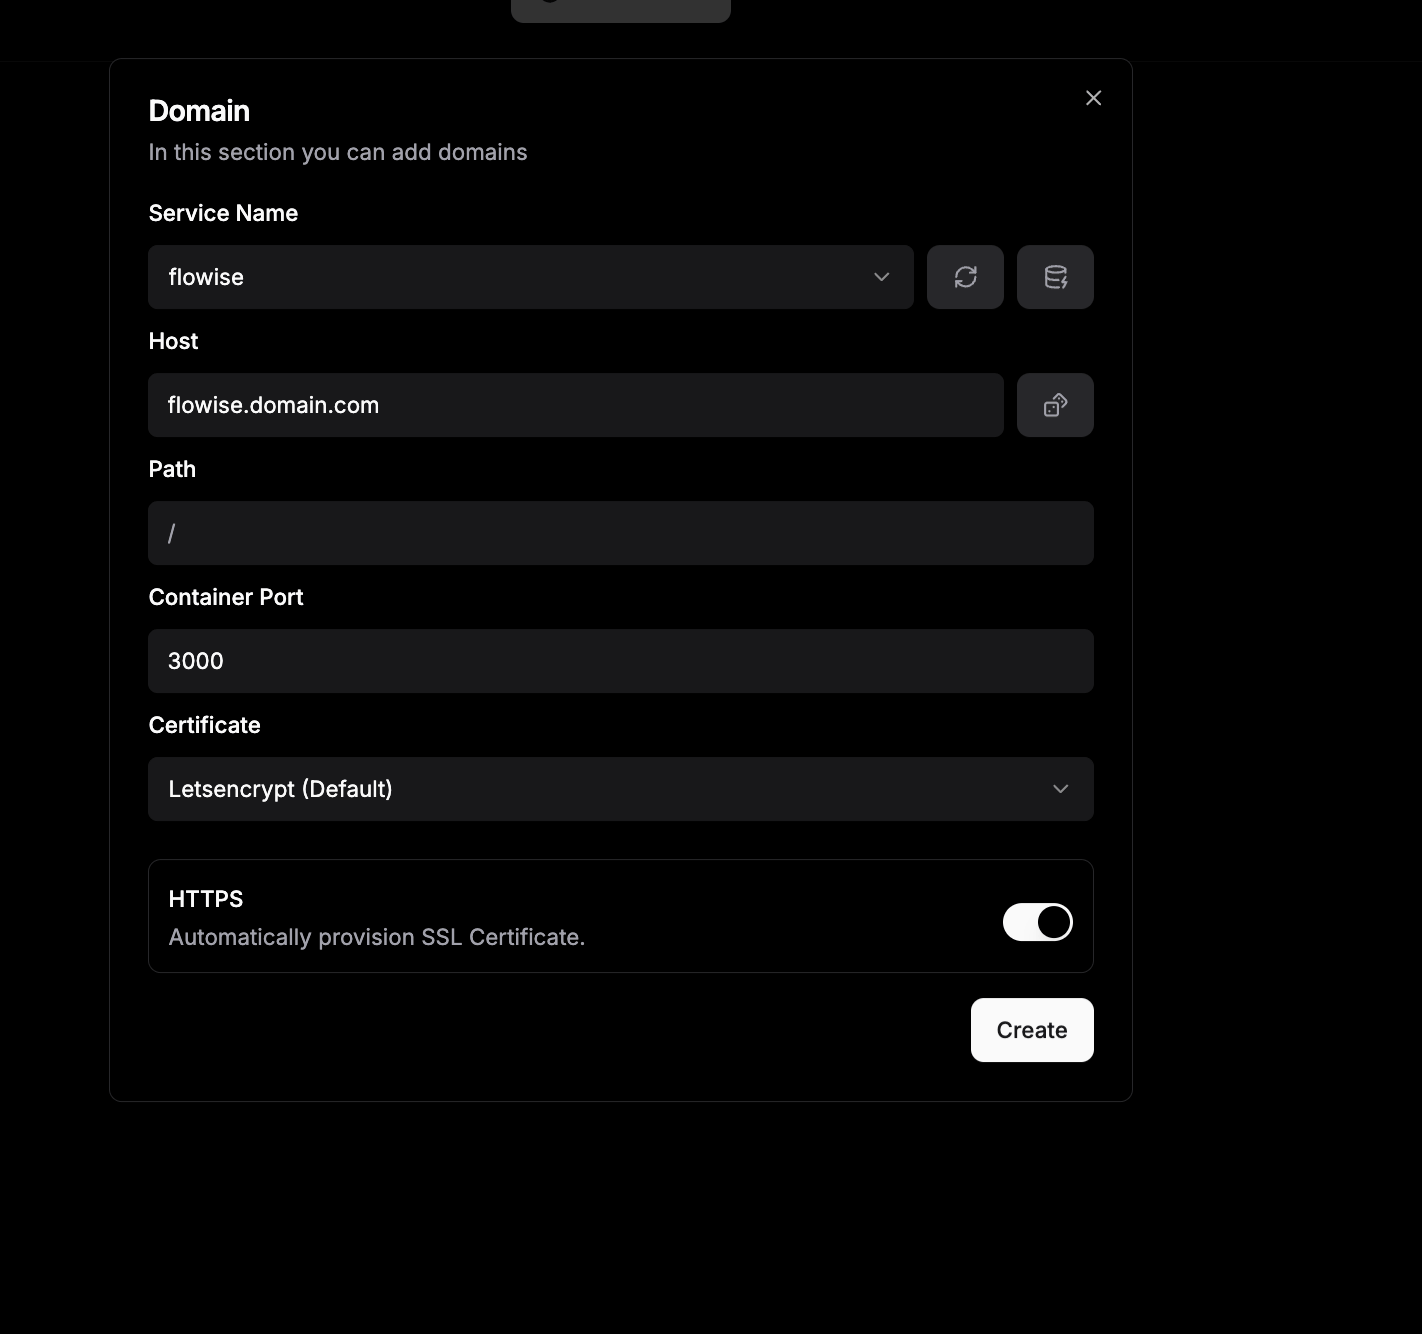
If you don’t want to use the labels in the docker-compose file you can use the domain tab and add the domain in there, you can refresh the service name and add the domain details with port in there. Dokploy will add the labels for you. It’s app to you.

5. Deploy your APP,
After the only thing remaining is to deploy your app, You move to General and hit Deploy, after you can check the logs in deployments to see the details and if successful.
Conclusions
Dokploy makes easy to deploy any app with docker compose, in this way you can take advantage of dokploy features and use docker compose.
If you are interested to see some free cool open source self hosted apps you can check toolhunt.net self hosted section.
Related Posts

Dockge Install - Portainer Alternative for Docker Management
Learn how Dockge can help you manage your Docker containers, stacks, and services with ease. Dockge is a web-based Docker manager that lets you self-host your own applications and services with minimal hassle.

How to Install LangFlow with Docker Compose and Add SSL Over CloudFlare Tunnels
Learn how you can install LangFlow with docker compose and Postgres DB and take advantage of no-code AI flows. Add SSL over CloudFlare tunnels

How to Deploy Your Link Shortener with Slash, Docker, and Dockge
Learn how to deploy your link shortener with Slash, Docker, and Dockge, and enjoy the benefits of smart link management and easy application deployment.