How To Secure a VPS Sever with CrowdSec
Secure the VPS server by blocking firewall access with CrowdSec by monitoring SSH and Nginx logs.

This tutorial focuses on securing your SSH access using CrowdSec, a modern, collaborative security solution designed to protect against various attack vectors, including those targeting VPS servers. Unlike traditional security tools, CrowdSec combines log analysis, behavior detection, and community-driven threat intelligence to proactively block suspicious activity while sharing insights across its user base.
In this guide, you’ll learn:
- Why securing SSH is critical for your server’s health and data integrity.
- What makes CrowdSec a standout security tool.
- How to install and configure CrowdSec on your VPS.
- Ways to monitor and analyze server logs, extend protection to other applications like Nginx, and link to the CrowdSec Console for centralized management.
Whether you’re a developer managing multiple servers or a small business owner hosting applications online, CrowdSec offers a reliable and straightforward way to enhance your security posture. This tutorial breaks down every step so you can follow along with confidence, even without extensive prior experience.
What Is CrowdSec and How Can It Help You?
Understanding CrowdSec
CrowdSec is an open-source, collaborative intrusion prevention system (IPS) designed to protect servers, services, and applications from malicious activities. It works by analyzing system logs, detecting suspicious patterns, and enabling proactive defense mechanisms. Unlike traditional security tools, CrowdSec actively shares threat intelligence with its global user community, allowing it to build a constantly evolving database of malicious IP addresses.
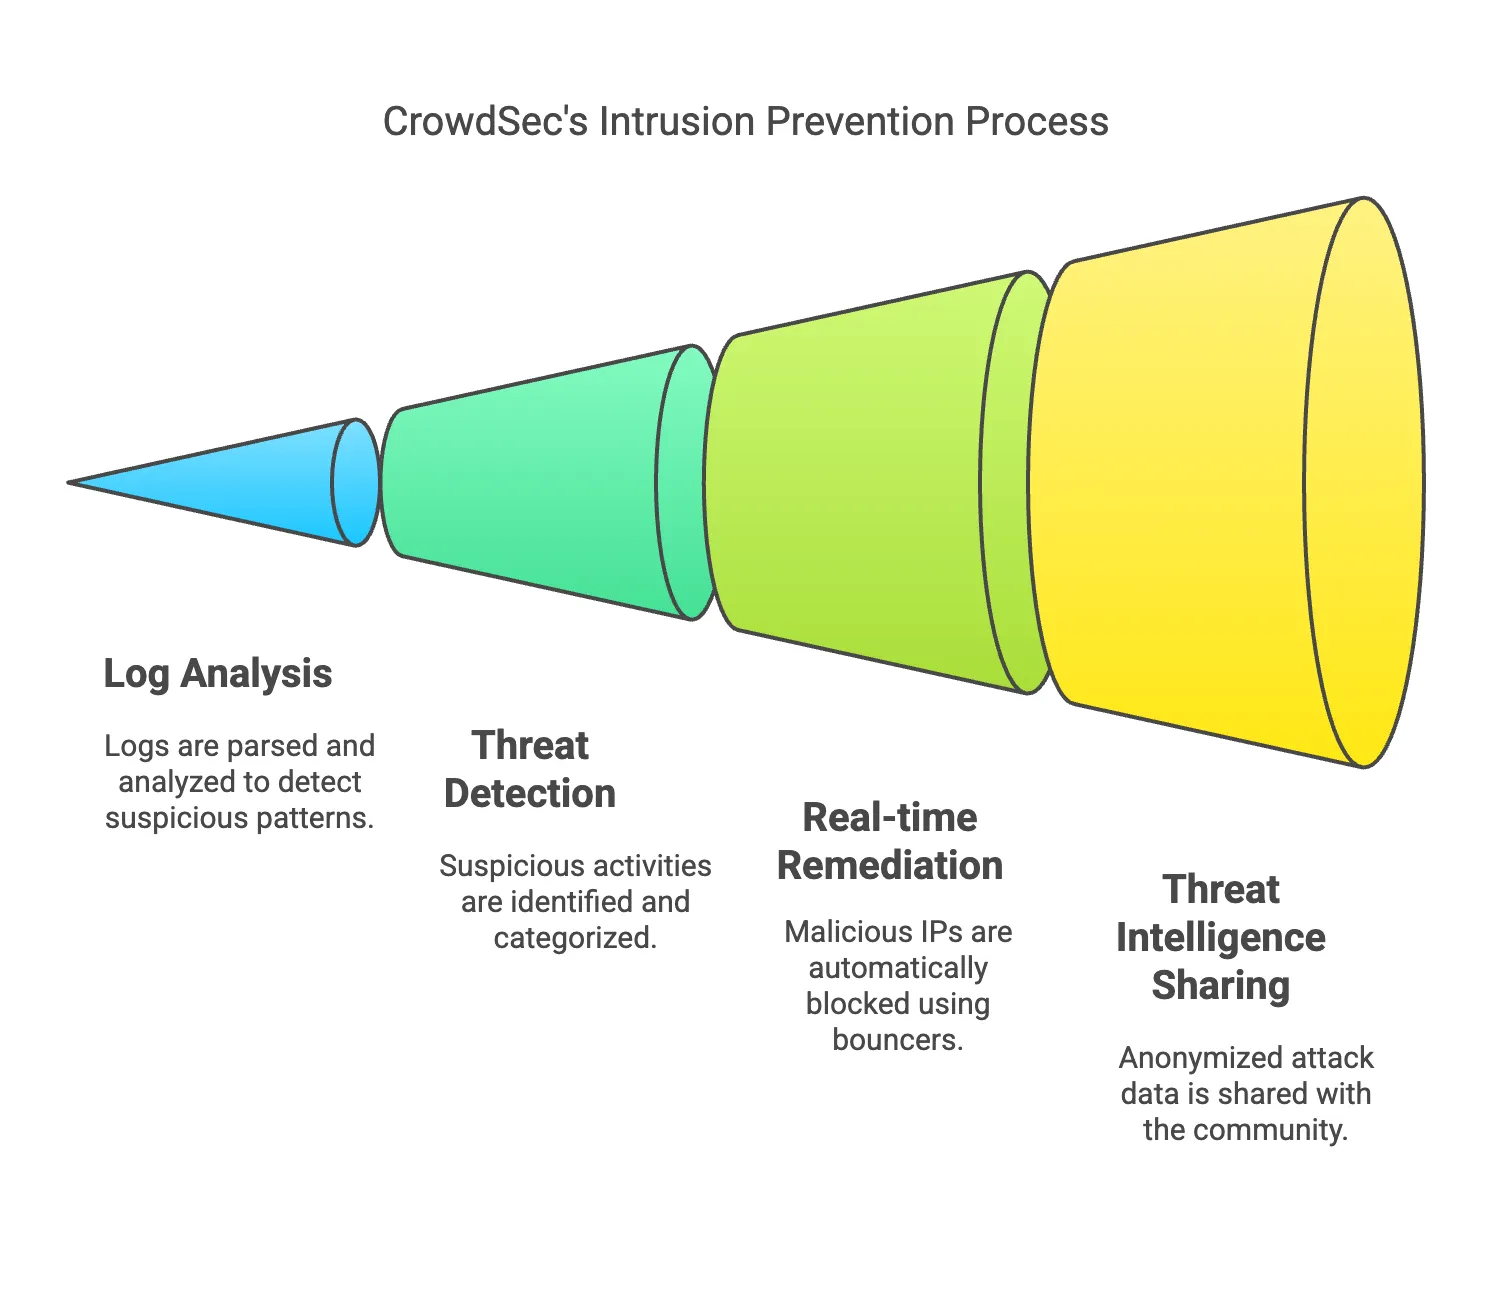
Here’s what makes CrowdSec a unique and powerful tool:
- Log Analysis: CrowdSec parses and analyzes logs from various sources like SSH, Nginx, and custom applications.
- Real-time Remediation: It uses “bouncers” (remediation components) to automatically block malicious IPs.
- Collaborative Threat Intelligence: CrowdSec leverages a community-driven model where users share anonymized attack data to improve overall global security.
What Problem Does CrowdSec Solve? Cyberattacks such as brute force, Distributed Denial of Service (DDoS), and credential stuffing are increasing in sophistication. While firewalls and intrusion detection systems (IDS) are helpful, they often lack real-time adaptability or community-sourced intelligence. CrowdSec not only detects these attacks but also provides actionable responses and leverages insights from other users to bolster your defenses.
Benefits of Using CrowdSec for Securing SSH
If your VPS uses SSH for remote access, leaving it unprotected can lead to:
- Unauthorized access via brute force attacks.
- Exploitation of known vulnerabilities in outdated SSH configurations.
- Server compromise leading to data loss or service disruption.
CrowdSec enhances SSH security by:
- Detecting Intrusions: Analyzing SSH attempt logs and identifying patterns like failed login attempts.
- Blocking Threats: Using remediation tools (like the Firewall Bouncer) to block malicious IPs.
- Providing Visibility: Offering detailed metrics and logs for monitoring failed attempts and remediation outcomes.
- Adapting Dynamically: Updating its detection rules automatically through its community-driven hub.
Why Choose CrowdSec Over Alternatives?
Here’s how CrowdSec compares to other security tools:
| Feature | CrowdSec | Fail2Ban | Traditional Firewalls |
|---|---|---|---|
| Community Intelligence | ✔️ Global threat sharing | ❌ None | ❌ None |
| Ease of Use | ✔️ Simple configuration | ✔️ Moderate complexity | ❌ Manual configuration required |
| Multi-service Support | ✔️ Supports many services | ✔️ Limited (e.g., SSH only) | ✔️ Generic (ports only) |
| Scalability | ✔️ Cloud-friendly | ✔️ Local VPS only | ✔️ Network-based |
| Real-time Blocking | ✔️ Fast with bouncers | ✔️ Moderate | ❌ Reactive only |
By opting for CrowdSec, you not only protect your VPS but also contribute to a larger global effort to fight cyber threats. It’s an excellent choice for developers, system administrators, and businesses looking for cost-effective, scalable, and collaborative security solutions.
Install CrowdSec
Installing CrowdSec on your VPS is a straightforward process that involves adding a repository, installing the package, and configuring it to monitor logs. Below is a detailed step-by-step guide to help you get started.
Step 1: Add the CrowdSec Repository
CrowdSec can be installed using its package repository for most Linux distributions. Add the repository by running the following command:
curl -s https://install.crowdsec.net | sudo shExpected Output:
Your system should respond with the following information, confirming the repository was successfully added:
Detected operating system as ubuntu/22.
Detected apt version as 2.4.13
Checking for gpg...
Detected gpg...
...
Installing /etc/apt/sources.list.d/crowdsec_crowdsec.list...
This command imports the necessary GPG keys and sets up the CrowdSec repository.
Step 2: Install the CrowdSec Package
Once the repository is added, update your package index and install the CrowdSec package:
sudo apt update && sudo apt install crowdsecImportant Notes:
- Port Usage Warning: CrowdSec’s local API uses port 8080 by default. Before proceeding, ensure the port is not already in use by checking with:
If port 8080 is busy, you can modify the configuration later (explained below).netstat -tulpn
Sample Installation Output:
Here’s an example of what you might see during installation:
Need to get 60.9 MB of archives.
After this operation, 249 MB of additional disk space will be used.
...
Setting up crowdsec (1.6.4) ...
Machine successfully added to the local API.
API credentials written to '/etc/crowdsec/local_api_credentials.yaml'.
...
Not attempting to start crowdsec, port 8080 is already used or lapi was disabled.
Step 3: Modify API Port (If Necessary)
If you encounter the error stating that port 8080 is in use, you’ll need to edit CrowdSec’s configuration files to change the default API port. Here’s a quick guide:
- Open the configuration files for editing:
sudo nano /etc/crowdsec/config.yaml sudo nano /etc/crowdsec/local_api_credentials.yaml - Change the
listen_uriunderapito a different port, such as 8081:listen_uri: 127.0.0.1:8081 - Save the files and restart CrowdSec:
sudo service crowdsec start
sudo service crowdsec status
Once updated, the service should run successfully, and you can verify its status with:
sudo service crowdsec statusExample Output:
● crowdsec.service - Crowdsec agent
     Loaded: loaded (/lib/systemd/system/crowdsec.service; enabled; vendor preset: enabled)
     Active: active (running) since Thu 2025-02-06 06:52:02 UTC; 5s ago
Step 4: List Installed Collections
After installation, CrowdSec automatically installs collections to monitor key services like SSH. To check the collections in use, run:
sudo cscli collections listExample Output:
COLLECTIONS
 Name                               📦 Status    Version  Local Path
─────────────────────────────────────────────────────────────────────
 crowdsecurity/linux                ✔️  enabled  0.2      ...
 crowdsecurity/sshd                 ✔️  enabled  0.5      ...
The crowdsecurity/sshd collection indicates SSH monitoring is active.
With CrowdSec installed and running, your VPS is now set up to detect and analyze potential threats targeting your SSH and other services.
Installing the First Remediation Component (Firewall Bouncer)
CrowdSec relies on remediation components called “bouncers” to block malicious actors based on detected attack patterns. The firewall bouncer is one of the most critical components for enhancing your VPS’s security since it works with your server’s firewall to block IPs flagged by CrowdSec.
Here’s how to install and verify the firewall bouncer:
Step 1: Install the Firewall Bouncer
To install the iptables firewall bouncer with CrowdSec, run the following command:
sudo apt install crowdsec-firewall-bouncer-iptablesOutput Example:
When the installation completes, you’ll see something like this:
The following NEW packages will be installed:
  crowdsec-firewall-bouncer-iptables
0 upgraded, 1 newly installed, 0 to remove and 4 not upgraded.
...
Setting up crowdsec-firewall-bouncer (0.0.31) ...
The bouncer is now integrated into your system and ready to block malicious IPs.
Step 2: Verify the Bouncer Installation
After installation, check the firewall bouncer’s status and confirm it’s operating correctly:
sudo cscli bouncers listExample Output:
╭───────────────────────────────────────────────────────────────────────────────────────────────────────────────╮
│ Name                            IP Address  Valid  Last API pull         Type                       Version    │
├───────────────────────────────────────────────────────────────────────────────────────────────────────────────┤
│ cs-firewall-bouncer-1738824978  127.0.0.1   ✔️    2025-02-06T06:57:35Z  crowdsec-firewall-bouncer  v0.0.31    │
╰───────────────────────────────────────────────────────────────────────────────────────────────────────────────╯
Key details in the output:
- Name: The unique identifier of the bouncer.
- Type: Indicates this is the
crowdsec-firewall-bouncer. - Status:
Validconfirms the bouncer is active. - Last API pull: Shows when the bouncer last synced with the CrowdSec engine.
Step 3: How the Firewall Bouncer Works
The firewall bouncer automatically updates your firewall rules with decisions made by CrowdSec. For example, if a brute-force attack is detected on your SSH port, the bouncer will add the attacker’s IP to the blocking rules in iptables.
You can manually verify the active firewall rules with:
sudo iptables -LTroubleshooting Installation Issues
If the firewall bouncer doesn’t appear in the cscli bouncers list output or isn’t working correctly:
- Restart the bouncer service:
sudo systemctl restart crowdsec-firewall-bouncer - Check the logs for errors:
sudo tail -f /var/log/crowdsec-firewall-bouncer.log
Why Is the Firewall Bouncer Important?
The firewall bouncer ensures that CrowdSec not only detects malicious activity but also takes immediate action to mitigate threats. It’s particularly effective in:
- Blocking brute force attempts on SSH.
- Stopping known malicious IPs based on community-shared data.
- Protecting other services like Nginx when integrated with appropriate configurations.
By enabling the firewall bouncer, you’re taking the most critical step in actively defending your VPS from real-time attacks.
See What Logs Are Monitored by CrowdSec
CrowdSec is designed to analyze logs from various sources on your server to detect suspicious patterns and potential attacks. Upon installation, CrowdSec includes default collections for commonly used services, such as SSH and Nginx. These collections specify which log files CrowdSec monitors and define the detection scenarios for each service.
Viewing the Log Files Monitored
CrowdSec creates and uses a file called acquis.yaml to configure the log files it monitors. You can inspect this file to see the services and log locations that CrowdSec is currently set up to analyze.
Run the following command to view the log monitoring configuration:
cat /etc/crowdsec/acquis.yamlSample Output:
# Generated acquisition file - wizard.sh (service: nginx) / files : /var/log/nginx/error.log
filenames:
  - /var/log/nginx/error.log
labels:
  type: nginx
---
# Generated acquisition file - wizard.sh (service: ssh) / files :
journalctl_filter:
  - _SYSTEMD_UNIT=ssh.service
labels:
  type: syslog
---
From this example, you can see that CrowdSec is configured to monitor:
- Nginx logs: Located in
/var/log/nginx/error.log. - SSH logs: Captured from journald using the
_SYSTEMD_UNIT=ssh.servicefilter.
This means CrowdSec will automatically analyze logs from these sources to detect scenarios such as brute force attacks, suspicious behavior, or repeated access failures.
Log Files Used by CrowdSec
CrowdSec itself generates its own set of logs to help you monitor its performance and functionality. These logs are stored in /var/log/ and include the following files:
| File | Purpose |
|---|---|
/var/log/crowdsec.log | Primary log for CrowdSec’s main engine. |
/var/log/crowdsec_api.log | Logs related to the CrowdSec API. |
/var/log/crowdsec-firewall-bouncer.log | Logs for the firewall bouncer performance. |
To view these logs, use commands like:
sudo tail -f /var/log/crowdsec.logWhy Is Monitoring Logs Important?
CrowdSec’s ability to monitor logs is the foundation of its detection and response capabilities. By analyzing logs from services like SSH and Nginx, it can:
- Detect brute force attacks and other suspicious patterns.
- Share anonymized attack data with the global CrowdSec network to improve the community database.
- Generate actionable remediation decisions (e.g., banning IPs).
Keeping an eye on what logs are being monitored ensures that your server is fully protected and that no critical service is left unguarded.
Linking to the CrowdSec Console (Optional)
One of the standout features of CrowdSec is the CrowdSec Console, a cloud-based dashboard that provides insights into your server’s security performance. The console offers centralized management, detailed attack visualization, and aggregated metrics, making it easier to monitor security events across different systems or environments.
Why Use the CrowdSec Console?
While the local CrowdSec installation provides powerful detection and remediation capabilities, the CrowdSec Console adds the following benefits:
- Graphical Data Insights: Visualize attack patterns and blocked threats in an intuitive, graphical format.
- Centralized Monitoring: Manage multiple CrowdSec instances across different servers from a single dashboard.
- Community Intelligence: View global attack trends based on community-shared intelligence.
- Easy Bouncer Management: Track and manage all active bouncers from one place.
The console is free and highly valuable for developers, system administrators, and small businesses.
How to Connect Your VPS to the CrowdSec Console
Step 1: Create a CrowdSec Account
Visit the official CrowdSec Console signup page to create a free account. You’ll need an email address to register.
Once logged in, you’ll gain access to the CrowdSec Console dashboard. From there, follow the steps below to enroll your server.
Step 2: Generate an Enrollment Token
To connect a CrowdSec instance (your VPS) to the console, you’ll need an enrollment token. Generate this token from the Security Engines section of the console dashboard:
- Log in to the CrowdSec Console.
- Navigate to Security Engines → Engines.
- Click on Generate Enrollment Token.
- Copy the generated token. You’ll need this in the next step.
Step 3: Enroll Your VPS Using the Token
Log in to your VPS and execute the following command, replacing <your-enrollment-token> with the token you copied earlier:
sudo cscli console enroll <your-enrollment-token>Sample Output:
INFO[01-10-2025 16:57:08] Successfully enrolled machine 'my-vps.example.com' to the ConsoleStep 4: Verify Enrollment
After enrolling, return to the CrowdSec Console and navigate back to the Engines section. You should see your VPS listed as an active engine.
Benefits of Using the Console
- Real-Time Alerts: Monitor active alerts and attacks in real time, directly from your browser.
- Attack Trends: Understand how often your server is targeted and what type of attacks are most common.
- Performance Metrics: Track how well CrowdSec is mitigating threats over time.
- Centralized Configuration: Manage configurations and adjust detection scenarios for all your CrowdSec-enabled servers from one interface.
Here’s an example of what the CrowdSec Console’s overview might look like:
| Metric | Description | Example Insight |
|---|---|---|
| Top IPs Blocked | Shows the most frequently banned IPs. | ”IP X.X.X.X blocked 200 times in 24 hours.” |
| Attack Trends | Displays common attack types. | ”60% of attacks in past week were SSH brute force.” |
| Event Timeline | Visualizes when attacks occurred. | ”Spike of 1,000 attacks at 2 a.m. yesterday.” |
| Global Intelligence | Community-sourced blocklists. | ”50 IPs globally flagged for DoS attacks.” |
Monitoring Application Logs (e.g., Nginx)
CrowdSec can monitor your application-specific logs, such as those from Nginx, Apache, or custom services, to detect and prevent attacks on web applications. This functionality ensures your entire server stack is secured, not just SSH. By analyzing logs from applications like Nginx, CrowdSec can detect patterns like bot attacks, vulnerability probes, or exploitation attempts.
Why Monitor Nginx Logs?
Nginx is a common web server used by many VPS setups to host websites and applications. Monitoring Nginx logs with CrowdSec adds the following benefits:
- Detect Web Attacks: Identify bots, vulnerability scanners, SQL injection attempts, and other malicious activities.
- Block Suspicious IPs: CrowdSec can instantly issue bans based on log analysis, stopping attackers before they cause harm.
- Centralized Protection: Combine Nginx log monitoring with SSH and other logs for all-in-one remediation.
Step 1: Install the Nginx Collection
CrowdSec uses predefined “collections” to analyze specific log types. If the Nginx collection is not already installed, you can add it with the following command:
sudo cscli collections install crowdsecurity/nginxThis collection includes detection scenarios tailored for Nginx logs, such as identifying SQL injection probes, directory traversal attempts, or bad user agents.
Example Output:
INFO[06-02-2025 07:00:02] crowdsecurity/nginx installed successfullyStep 2: Update the acquis.yaml File
To enable CrowdSec to monitor your Nginx logs, you need to add their file paths to the configuration file located at /etc/crowdsec/acquis.yaml:
-
Open the file for editing:
sudo vi /etc/crowdsec/acquis.yaml -
Add the following entries under the
filenamessection for Nginx logs:filenames: - /var/log/nginx/error.log - /home/*/logs/nginx/*.log labels: type: nginx ---- The first path (
/var/log/nginx/error.log) includes the default error log for Nginx. - The second path (
/home/*/logs/nginx/*.log) allows for monitoring additional application-specific logs (e.g., virtual hosts).
- The first path (
-
Save and exit the file.
Step 3: Restart the CrowdSec Service
After updating the configuration, restart the CrowdSec service to apply the changes:
sudo systemctl restart crowdsecStep 4: Verify Functionality
To ensure that CrowdSec is actively monitoring Nginx logs:
-
Tail the CrowdSec logs in real time to see if it’s processing Nginx logs correctly:
sudo tail -f /var/log/crowdsec.log -
Check for alerts or decisions related to Nginx:
sudo cscli alerts list
sudo cscli decisions list
If everything is working correctly, you will see entries related to Nginx logs, such as blocked IPs or detected attack scenarios.
Example Scenarios for Nginx Monitoring
When you enable Nginx log monitoring, CrowdSec can detect and mitigate the following attack types:
- SQL Injection Probes: Attempts to exploit database vulnerabilities.
- Directory Traversal Attacks: Malicious requests designed to access unauthorized files or directories.
- Bad User Agents: Bots or scrapers with malicious intent.
- Rate Limiting Violations: Excessive request patterns from abusive IPs.
By monitoring Nginx logs with CrowdSec, you extend protection to your web applications, ensuring that both your server infrastructure and hosted services are secure.
Useful CrowdSec Commands
After installing and configuring CrowdSec, it’s crucial to know how to monitor its activity, manage alerts and bans, and optimize its effectiveness. This section provides a breakdown of the most useful CrowdSec commands, empowering you to stay on top of your server’s security.
1. View Active Decisions (Current Blocks/Bans)
The decisions list command shows all IPs currently being blocked by CrowdSec.
sudo cscli decisions listExample Output:
╭────────────┬─────────────┬────────────┬──────────────╮
│  IP        │  Reason     │  Action    │  Expires at  │
├────────────┼─────────────┼────────────┼──────────────┤
│ 192.168.1.1│ ssh-bf      │ ban        │ 2025-02-06T12:00:00Z │
│ 203.0.113.5│ nginx-bot   │ ban        │ 2025-02-06T23:59:59Z │
╰────────────┴─────────────┴────────────┴──────────────╯- IP: The IP address being blocked.
- Reason: Cause of the block (e.g., SSH brute force).
- Action: The remediation applied (e.g., ban).
- Expires at: The time when the block will expire.
This command is helpful for reviewing which IPs are actively banned and why they were blocked.
2. Check Recent Alerts
The alerts list command displays recent security alerts generated by CrowdSec. Alerts are triggered by detection scenarios and may result in bans or other actions.
sudo cscli alerts listExample Output:
╭───────┬───────────────────┬────────────────────┬──────────────╮
│  ID   │  Scenario         │  Source IP         │  Created at  │
├───────┼───────────────────┼────────────────────┼──────────────┤
│   1   │ ssh-bf            │ 203.0.113.5        │ 2025-02-06   │
│   2   │ nginx-bad-user-agent │ 198.51.100.10    │ 2025-02-06   │
╰───────┴───────────────────┴────────────────────┴──────────────╯- Scenario: The attack type detected (e.g.,
ssh-bffor SSH brute force). - Source IP: The IP address responsible for the attack.
- Created at: When the alert was triggered.
Use this to investigate suspicious activity and identify trends in attack attempts.
3. View Security Metrics
The metrics command gives an overview of CrowdSec’s activity, including parsed log files, detected threats, and actions taken.
sudo cscli metricsExample Output:
Local API Alerts:
╭───────────────────────────┬───────╮
│ Reason                    │ Count │
├───────────────────────────┼───────┤
│ crowdsecurity/ssh-bf      │ 15    │
│ crowdsecurity/nginx-bot   │ 10    │
╰───────────────────────────┴───────╯

Bouncer Metrics:
╭────────────────────────────┬──────────────────┬───────────╮
│ Origin                     │ Active Decisions │ Dropped   │
├────────────────────────────┼──────────────────┼───────────┤
│ crowdsecurity (engine)     │ 22               │ 14.5k     │
╰────────────────────────────┴──────────────────┴───────────╯
This command provides clear insight into how many attacks were detected, blocked, and their source.
4. Monitor Logs in Real Time
To watch CrowdSec in action, use the tail command to view log entries as they are being processed.
sudo tail -f /var/log/crowdsec.logThis is especially useful for troubleshooting and for seeing real-time detection events.
5. List Active Detection Scenarios
CrowdSec uses predefined “scenarios” (detection rules) to identify suspicious behavior. To see which scenarios are currently enabled on your system, use:
sudo cscli scenarios listExample Output:
╭───────────────────────────────┬────────╮
│ Name                          │ Status │
├───────────────────────────────┼────────┤
│ crowdsecurity/ssh-bf          │ ✔️ enabled  │
│ crowdsecurity/nginx-bad-user-agent │ ✔️ enabled  │
│ crowdsecurity/http-crawl-non_statics │ ✔️ enabled  │
╰───────────────────────────────┴────────╯
This ensures that CrowdSec is configured to detect relevant types of attacks, such as SSH brute force and web application abuse.
6. Add or Remove a Block Manually
You can manually add or remove an IP block using CrowdSec. This is useful if you want to preemptively block a known bad actor or whitelist a trusted IP.
Add a Manual Block:
sudo cscli decisions add -i <IP> -t ban -r "Manual ban"Remove a Block:
sudo cscli decisions delete -i <IP>7. Unblock an IP
If you need to remove a block for a specific IP address (e.g., if it was mistakenly added), you can do so with:
sudo cscli decisions delete --ip <IP>Summary of Useful Commands
| Command | Purpose |
|---|---|
sudo cscli decisions list | List all active bans and blocks. |
sudo cscli alerts list | View recent alerts triggered by attacks. |
sudo cscli metrics | Display security metrics and performance. |
sudo tail -f /var/log/crowdsec.log | Watch logs and detections in real time. |
sudo cscli scenarios list | Show all active detection scenarios. |
sudo cscli decisions add | Manually block specific IPs. |
sudo cscli decisions delete | Remove a block for a specific IP. |
Practical Usage Scenarios
- Daily Monitoring: Use
cscli alerts listandcscli decisions listto check for recent activity and blocks. - Investigating Attacks: Use
cscli metricsto analyze attack trends and identify patterns. - Troubleshooting Issues: Use
tail -f /var/log/crowdsec.logto debug scenarios or log processing problems. - Fine-Tuning Detection: Use
cscli scenarios listto enable or disable specific detection rules based on your server’s needs.
By mastering these commands, you can efficiently manage, monitor, and optimize CrowdSec to protect your VPS from cyber threats.
Conclusion
Securing your VPS is a critical step in protecting your applications, data, and infrastructure from malicious cyber threats. SSH, being a common entry point for attackers, requires robust protection, and CrowdSec provides an effective, scalable, and community-driven solution to meet that need.
In this guide, we’ve covered every step you need to take to use CrowdSec to secure your VPS:
- Installing CrowdSec: Setting up the core CrowdSec engine to monitor and analyze server logs.
- Installing the Firewall Bouncer: Enabling automatic remediation by blocking malicious IPs at the firewall level.
- Configuring Log Monitoring: Extending protection to application logs (e.g., Nginx) to safeguard your entire server stack.
- Using Metrics and Commands: Leveraging CrowdSec’s metrics and commands to monitor and fine-tune your security setup.
- Optional: Linking to CrowdSec Console: Utilizing a centralized management platform for streamlined and graphical security insights.
CrowdSec offers key advantages over traditional security tools by combining detection, remediation, and collaborative intelligence. Here’s why it stands out:
- Ease of Use: Simple installation and configuration, even for beginners.
- Real-Time Defense: Proactive blocking of attackers based on server activity logs.
- Community Intelligence: Benefit from global shared threat data to stay ahead of emerging threats.
- Scalable: Protects one VPS or an entire server fleet with cloud-friendly tools.
By following this tutorial, you’ve not only secured your SSH service but also empowered your VPS to block malicious actors proactively, helping to reduce the risk of data breaches and server compromise.
By taking the time to secure your server with CrowdSec, you’ve made a significant investment in your VPS’s security. Keep the system updated, monitor its performance, and continue exploring CrowdSec’s features to strengthen your defenses further. Security is an ongoing process, and with CrowdSec, you’re well-equipped to stay ahead of the curve.


